Tuesday, December 14, 2010

Cookie Exchange Party....YUM!!

I participated in a lovely cookie exchange holiday party last Saturday night.  We were asked to bring 3 dozen cookies to share.  Look at all the goodies! About 8 different types of cookies with all manner of spices and chips and fruit and nuts.  There was even little spice cake loaves, key lime fudge and gooey chocolate caramel squares.
This was my contribution.  My Award Winning Snickers Surprise Cookies.  ON A STICK!  I made these a few years ago for another cookie exchange party where we had to taste each cookie and vote.  Mine won first prize - appropriately enough, a cookie cook book.   Nothing special to making these, just wrap a mini snickers chocolate bar in peanut cookie dough and bake.  A few weeks ago i made them with store bought sugar cookie dough - just as good, but i like the peanut butter - nut - caramel combination better. For an added fun twist this time i added the sticks - they are Wilton, purchased at Michaels. And no, they don't burn in the oven.  Just stab the snickers bar and wrap with a ball of dough.  They spread and flatten as they bake - so leave space.
And here displayed on a pretty wicker tray provided by our lovely hostess Karen, are the cookies i got to take home!  She set up a cookie decorating station for the kids - but i had a blast creating my sparkly snowflake and Christmas tree shaped treats.
Karen also prepared a tasty dinner for the party and had all her beautiful Christmas decorations around the house.  Including three full size trees decorated in different themes!

Monday, December 6, 2010

Play Date - Altered Bird Houses

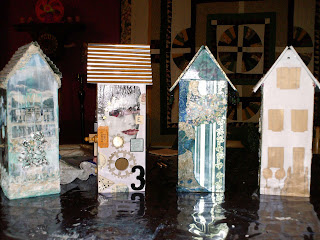
 Yesterday, i had the pleasure of spending a rainy Sunday with three artist friends.  We were told we were going to alter houses.  Bring some stuff. Not sure what to bring - i chose my standard ephemera and robin's egg blue assortment of papers, and grabbed a few metal embellishments.  The houses turned out to be wooden bird houses - designed to hold a wine bottle that Karen's husband made.  These were leftovers from another project.  We had the option of using corrugated metal roofs, or using foam core. (sorry for the grainy phone camera pics - i'll update later with better ones)
 It is fascinating to me to see what 4 people will do with the same canvas.  Here you can see how varied our houses turned out to be! Mine is mostly pale blue and cream, bird themed of course.  Dorothy's is an eclectic mix of collage and chunky three dimensional objects.  Shelley's is a deep rich blue with metallic accents.  And Karen's was created with an assortment of white gauze and ecru lace glued onto the white box.
 On this side you can see some of the house numbers we added.  And the lovely beaded fringe on Shelley's eaves.
 (note not all of us were finished!)  On mine you can see i tried a photo collage where an image of a house was cut into cubes and spaced apart.  A cool technique i'd like to try again.  Dorothy's face has the eyes and lips of a different magazine image - also very effective.  Karen plans to paint one side of her house to match another painted row house.
 On this view you can see the cherub i have sitting on the brass key i stuck into the house as a perch. Love Dorothy's use of gears and game pieces on her house.  Shelley's roof was gold metallic paper printed and embossed to look like eyelet.  Karen isn't finished her roof of shingles and lace.  and she plans to add buttons.
 Those eggs are cut from a napkin - so the papers underneath show through.
Here's a better shot of that house cut into blocks.  The flower applique is a metal finding that was meant for a wine bottle.I glued some ecru lace around the top edge of the box and sat the corrugated metal roof on top.  I painted it white and added some blue splotches.

Tuesday, November 30, 2010

Deli Paper Blitz

Last night i went on a blitz painting deli paper.  As you may know, this is my favorite medium for background paper for altered books.  Better to paint and get messy OUTSIDE the book, and glue the lightweight paper into your book.  Deli paper glues beautifully.  if you don't know, deli paper is thin paper sold in boxes of hundreds or even thousands at places like costco or the grocery outlet.  They come in different sizes - these were about 12" square. They are fantastically cheap, about $8 for a thousand sheets! And yes - they are used in deli's to wrap sandwiches.  Not to be confused with wax paper.  these are just plain and have a matte or dry side and slightly shinier side.  You can paint on either.
I created about 30 sheets of paper in about an hour or so.  Using three sheets at a time i squirted in rough stripes of acrylic paint and smeared and blended with my favorite expensive art supply tool - old credit cards.  Or in my case brand new credit cards as sent from the credit card companies in the mail.  As if holding an American Express card with "your name here" would excite me so much that i would instantly sign up for their program.  It did excite me, you know, but not in the way they intended, 'cus a crafty girl can never have enough art supplies!
I worked in a limited palette of reds, green, white and blues. Creating three more or less the same in one batch.  Moving them to another part of the dining room table, and then starting another batch.  It does not take long to run out of room. If you have space - you can put newspapers on the floor and lay them out to dry.  Or a clothesline would be cool!  But i just butted the sheets together - paint to paint, stacked them and hoped they did not stick together.  They didn't.  But i cannot guarantee that.  I am sure it depends altogether on the type of paint and how much.  I focus on scraping OFF all the excess paint with the credit card, so they will dry quickly.
After they were mostly dry they each got a final coat of silver metallic paint.  Just scraped on with the same credit card. A handy-wipe would have worked even better.  But that would have meant a trip back upstairs.  If there is one thing i can share with my readers - it is fast and easy tips. Work with what you've got!
So why?  Why did i spend an evening painting 30 sheets of deli paper when i could have been watching the 49er's trounce Arizona with my hubbie?  Because i created a slew of Christmas cards - and i don't have matching envelopes! You can see a mock up here of what the deli paper will look like when it is folded into an envelope shape around a Christmas card.  Cool, eh? I could stamp onto them at this point - or just add the address labels.  I could cut them out with an envelope template - or just glue them on and add a decorative sticker.  We'll see when i get to that point.  I'll be sure to share!
For more exciting deli paper posts click here and here and here and here.

Sunday, November 14, 2010

Antique Amulets

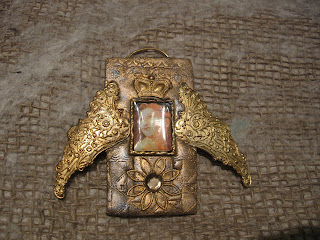
 Today i had the pleasure of reconnecting with my old altered book workshop buddies in San Francisco.  We used to meet monthly, swap books and do a project or learn a new technique.  Today they were creating "antique amulets" based on class one of them took at Art Unraveled with polymer clay wiz Laurie Mika.
 I have only used polymer clay once before - so it was fun to learn something new!
 This was my first pendant.  I softened the black clay and rolled it to about 3/8th of an inch thick.  I stamped it with a gothic texture stamp and created a niche with the frame.  I added an image and some metal findings.  then it was baked for about 20 minutes in a toaster oven.  When it came out i added some metallic glazes and gold paint to highlight the raised areas.


 This was my last piece - you can see i had a little whtite clay left which i swirled with black to create this border.
Here are the original inspiration!  These were the samples created by Laurie Mika - not by me!  But i think i did a pretty good job emulating her style.

Christmas Gift Tags

 After making christmas cards this weekend, i thought i would make some tags.  They might end up attached to cards.  They might end up on gifts.  They might end up hanging from a tree or even a banner. They are so fun and fast and easy to make!  For these i used an assortment of vintage themed scrapbook paper and some lovely Florentine inspired prints.  I cut the birds out of a scrapbook paper and the dragon fly and moth are two dimensional stickers with vellum wings from Joann's dollar selection.
These cute little tags were copied from my friend who had the idea to cut out these ornament shapes from a sheet of scrapbook paper and attach them to tags.  I just loved the colours - a nice variation from traditional green and red.
I used background paper that was already sort of patchwork-y or added my own blocks and stripes.  I glued down the "string" of the ornament to the tag, and placed a foam glue dot underneath to lift it up.  Then comes the fun part of selecting assorted ribbons and fibres to tie through the hole.
Click on photo to enlarge to see the sparkley details!

Christmas Cards 2010

 I got together with some friends this weekend to make christmas cards. I actually took Friday off work for a special playdate!  I had gone to Paper Source a week ago to get some inspiration and buy supplies.   For the card above i used a robin's egg blue card and matching envelope.  I added the japanese paper that i tore with a ruler for a gentle edge.  I cut the birds out of old novels and darkened the edges with a bit of walnut ink pad.  A little blue gem eyeball adds a touch of bling.
 We had a long conversation about my self imposed rule that all my christmas cards have to be the same.  Why?  They don't really.  So after making the cards above (about 50 of them!) i went on to create these different designs. These gold trees were cut from paper from Anthropologie.  You HAVE to check out their selection of papers and tags - so cute and different.
 I copied this card from a sample my friend had saved from last year.  The original was made with pretty bright coloured felt squares with some stitching, rather than the snowflakes.  I liked the simplicity of the design. Cute and modern!
For these cards i simple cut out a tree shape from multi-striped hand made paper.  The green is from Paper Source.  The blue is from Anthropologie. I attached them to long cards and will probably add a bit more something - not sure what - maybe some gemstone ornaments or some sparkley garland.
 Next, one of the ideas i had been mulling over was to create cards with christmas tree shapes made out of old postage stamps.  I have HUNDREDS of these, but limited myself to christmas themed stamps from various countries, and stamps with kings and queens.  For no other reason than i had a lot in red or green.
 I also added some "faux" stamps cut from wrapping paper.  I applied the stamps with a mini glue dot roller.  It went really fast and easy.  I love how they turned out!
Finally - here is a shot of the rest of the wrapping papers from Anthropologie. Aren't they gorgeous?  The pink flowers are actually glued to a mesh background - so they are light and ethereal.  I can't wait to come up with more projects for these papers.  Um, no.  I will NOT be wrapping any actual gifts with them!!

Monday, November 8, 2010

Sundance Holiday Ribbon and Trims

Maybe you don't get the Sundance catalog or have a store near you - so i wanted to share some cool things they are selling this holiday season.
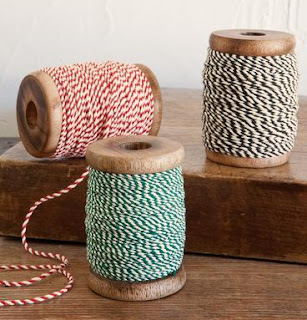
I saw these cute spools of ribbon and twine in their Corte Madera store, sold in sets of three or 5 and it was really tempting to buy them! I have seen that type of velvet ribbon on a wooden spool before - sold for a much higher price. Here, the 5 spools, 10 yards of each colour, for $28. That's 56 cents a yard - not bad. And so pretty!  Don't even use them!  Just put them in a little bowl and enjoy!!

The baker's cord is really nice - a heavier weight than the martha stewart twine sold at michaels. Perfect for those simple packages or to tie tags onto a gift. The set of three is $18 for 54 yards of each colour.
Check our the selection at the Sundance Catalog. FYI - i am in no way affiliated.  I just wanted to share!

Sunday, November 7, 2010

A fresh look....

After an absence of more than a month, i finally made some blog entries to share my latest creative pursuits.  When i "signed in" to blogger i was asked if i wanted to change my look, try on a new template so to speak.  So why not? 


I chose this layout because i continue to be obsessed with robin's egg blue and all things bird related.  I keep expecting it to end.  I really should be ready to move on to something new.  Remember Cabbage Roses?  I was really into those back in the 80's. 

October Altered Calendar Swap: Circus Theme

 Here are the pages i did in Dorothy's circus themed calendar.    Once i get this in the mail tomorrow - I'll be all caught up Still not quite organized after the big move in September.  But i spent many hours in my craft room this weekend and last creating these pages.  Here is the link to the pages i did last Spring.
 I purchased a grab bag of circus themed papers from Zinnia in South Pasadena before i moved north - knowing i would have this book to work in.  Unfortunately i did not get to attend their fall show - with a Cirque de Bizarre theme.  In the stash of papers was this title page about strange creatures - well it was just the thing to pair with Lionel here.

 The page on the left was in the book - i added the page on the right - for a riot of circus activity. The glitter circus letters were added for some texture.
 The page on the left was in the book - circus acrobats with really strong hair, i guess.  So i added Carlotta on the right - since she apparently had really strong teeth. And they both had lovely pink accents - so i tied them together with some lace, ribbon and buttons.  Some dictionary text adds a nice vintage touch. Tea and Teeth.
 The page on the right reminded me once again of that Anthropologie catalog from last year with the circus images.  Hard to believe i didn't have to dig too deep into my boxes of papers to find the page on the left.  I know, right?  A perfect match!  Well - i did give them some gingham and calico skirts to tie them all together. And a really crappy attempt at making red pompoms out of yarn.
And finally here is the sign in page Dorothy created for us.  I found (again completely by accident) an image from a Degas painting of two circus girls.  I could have created a whole spread with them!  But too late - they'll have to content themselves at the back of the book with the other circus characters!

Altered Calendar September - Garden Theme

Here are my pages from the September for the altered calendar swap.  The theme was "Gardens"  But the starting point is racy romance novel images -so you have to work them into your design. Since these calenders are going around "twice" you can see the pages i did last March here.
On this spread i painted around the female on the right with a copper paint pen.  I had just purchased a roll of copper metallic organza ribbon - so i wanted to use that somehow.  I decided to create a subtle ruffle down the left side of the page and add a bunch of yellow flowers glued on top with sticky dots.
A fall themed napkin cut into strips provided the borders.  Another yellow flower helped to frame the ladies face.

 On this spread i did some journaling but then decided to cover it with green mulberry paper.  I framed the pages with colourful borders from a Dover book.  A few butterflies and sticker quotes complete the pages.
For this saucy wench, i gave her a gown of red flowers.  Let me explain about all these blooms!  I went to an estate sale with another creative buddy.  The apartment was owned by an artist and was filled to the brim with fabric and sculptures and painting and photography and all sorts of evidence of her creative life.    Not wanted to go "crazy" i only bought a few things - a baggie filled with foreign stamps. a few books.  And a giant stack of flower photographs that had been meticulously cut out.  You can see the yellow flowers above how much time must have been put into this task.  Not something i would ever care to do!!
But i certainly enjoyed using them in this garden themed altered calendar!