Monday, September 30, 2013

Play Date: Collage and Paint

Like the project i did last month with my friend L, the three of us each created a collage and turned it into a painting. We started by painting white gesso on a wooden board or canvas.  then added collage papers in a completely random way.   My landscape started out as a patchwork of assorted papers like this:
The idea is to just rotate it around until you "find" the art within.  Frankly i didn't see anything!  but D and S saw a landscape of sorts.
So take a dark paint and outline or create your image.  then fill in around with paint.  You can "cheat" a little and add some additional collage materials - as you can see above i added trees and a bird.
Here is S's collage - you can see how in her case there was clearly a bird flying in the middle of the collage. - so she went with that!
 Look how cool it looks - you can still see some texture on the canvas.
Here is D's collage - with the beginnings of her image.  She "saw" a highway patrolman in her collage and just brought out his face.
By the time she was done, well, she "saw" an ice cream cone and a watch and a few other random shapes.  So cool!  it helps to just be free and go with it!

Altered Calendar - October

For this month's altered book round robin calendar swap - i had S's book The Odditorium.  You can see the pages i did in it back in the April HERE.  The goal is to add colourful and unusual characters - real or imagined.  I found two Modigliani prints in a book - which i cut out and places on a hand painted deli paper background. I wanted to add a witty comment about the couple on the right, which was titled Bride and Groom by the artist.  But they just don't look like a married couple to me - so it didn't work.  I searched through a book looking for something to caption the pages, and went with a modified dedication - To mother and father and sister Vera,  then on the facing page, added "Why the long faces?"
For my next spread i did a portrait composition using one of Julian Schnabel's portraits with the texture of plates under the paint.  A bit of Portfolio oil pastels to blend in the background.  I flipped through a children's book and found the caption you see above. I thought it was fitting!

Monday, September 9, 2013

Altered Book Flower Techniques - Weaving!

 For our continuing altered calendar round robin, i had Z's book to work in.  She asked each of us to create pages that show off a NEW technique, using flowers as the theme.  You can see what i did last time HERE.  I decided to show off various paper weaving techniques.  For the first half spread i used a glossy magazine image of a rose bush - cut in straight lines, combined with a rosy coloured textured paper cut in curvy lines.  The cool thing about paper weaving is that you can cut the paper anyway you want - and it will fit together!  My pictures are not great (too much glare) but you can see the play on print and solid.  I added a few flower appliques on the side.
 For this spread i used two pages from a museum ad in a magazine featuring tiffany glass style windows.  Since i had two large pages, i could show what happens when you mix two SIMILAR images.  I cut thin and thick lines in each.  It could use some embellishments - some jewels perhaps? to finish it off.
 Here i chose two DIFFERENT but patterned floral papers and cut the paper on the diagonal.  This looks easy but is really tricky to do - well, it is finicky to say the least.  A couple of layered flower petals complete the page.
For the last spread i wanted to try something really challenging - so i chose a traditional flower illustration and a vintage business document.  Instead of just cutting the flower page into strips, i cut out each stem, leaf and flower and wove the strips of the document in and around them.  I tried to respect the "over/under" process in weaving, but hated to cover up too much of the flowers.  Anyway - it came out interesting to say the least!

Sunday, September 8, 2013

Altered Postcard

I bought a set of plain white bird postcards with simple bird illustrations.  This one is the Blue Footed Booby from the Galapagos Islands.  I wanted to alter it to add a little more zazz.  I added some text from a french vintage dictionary, and then the entry for Darwin from an old Oxford. I created a new wing for the bird from another dictionary page. a bit of Porfolio oil pastels in green and pink toadd some colour,  and a postage stamp with a frog fossil is the finishing touch.

Daring Adventures in Paint

I started an online course with Mati Rose McDonough called Daring Adventures in Paint.  Our homework for this week was to experiment with backgrounds. We also had some smaller tasks like find a new artist, look for red things, buy some new magazines, and pick out some paint samples at the hardware store.    we were shown a couple of videos and told to just have fun and play and not over think it!  Here is my progress with the backgrounds.
 i started with three globs of paint on each canvas (i did two simultaenously).  Medium blue, aqua and silver.  just literally reached into a box of paint and went with it!
 i smooshed them all around with a large brush and this was the soft blue result.
 these might eventually become a dyptique - who knows!?
 once the first layer was dry i added globs of  yellow/orange pale green and more blue.
 then i added some brown and added squiggles and words with the end of the paint brush.
 more brown and more squiggles
then i added some streaks of white/buff with the end of the paint brush and some magenta dots
and there you have it...  two interesting backgrounds - i'll patiently wait for our lessons from week 2 to find out what to do next!

Tuesday, September 3, 2013

Pacific Northwest Art Retreat

 I had the pleasure to spend the long weekend with my friend Lucie at her new home in Washington State.  She prepared an "art menu" for me to chose activities from.  We started with this "etch a sketch" style art work. 
You start by creating a single line drawing with a gel pen on coloured paper.  Mine was pale blue - not the grey it appears to be here.  In one continuous line you add whatever comes into your head - real or imagined, trying to fill the page.
You can "cheat" and go back and add additional details as you can see here.  Then you use coloured pencils to add the colour and whimsy you can see up top!
Here is one that Lucie did.  We agree we like the dark background much better - it gives the colours more "pop"!
And here is another one Lucie did - aren't they cute!
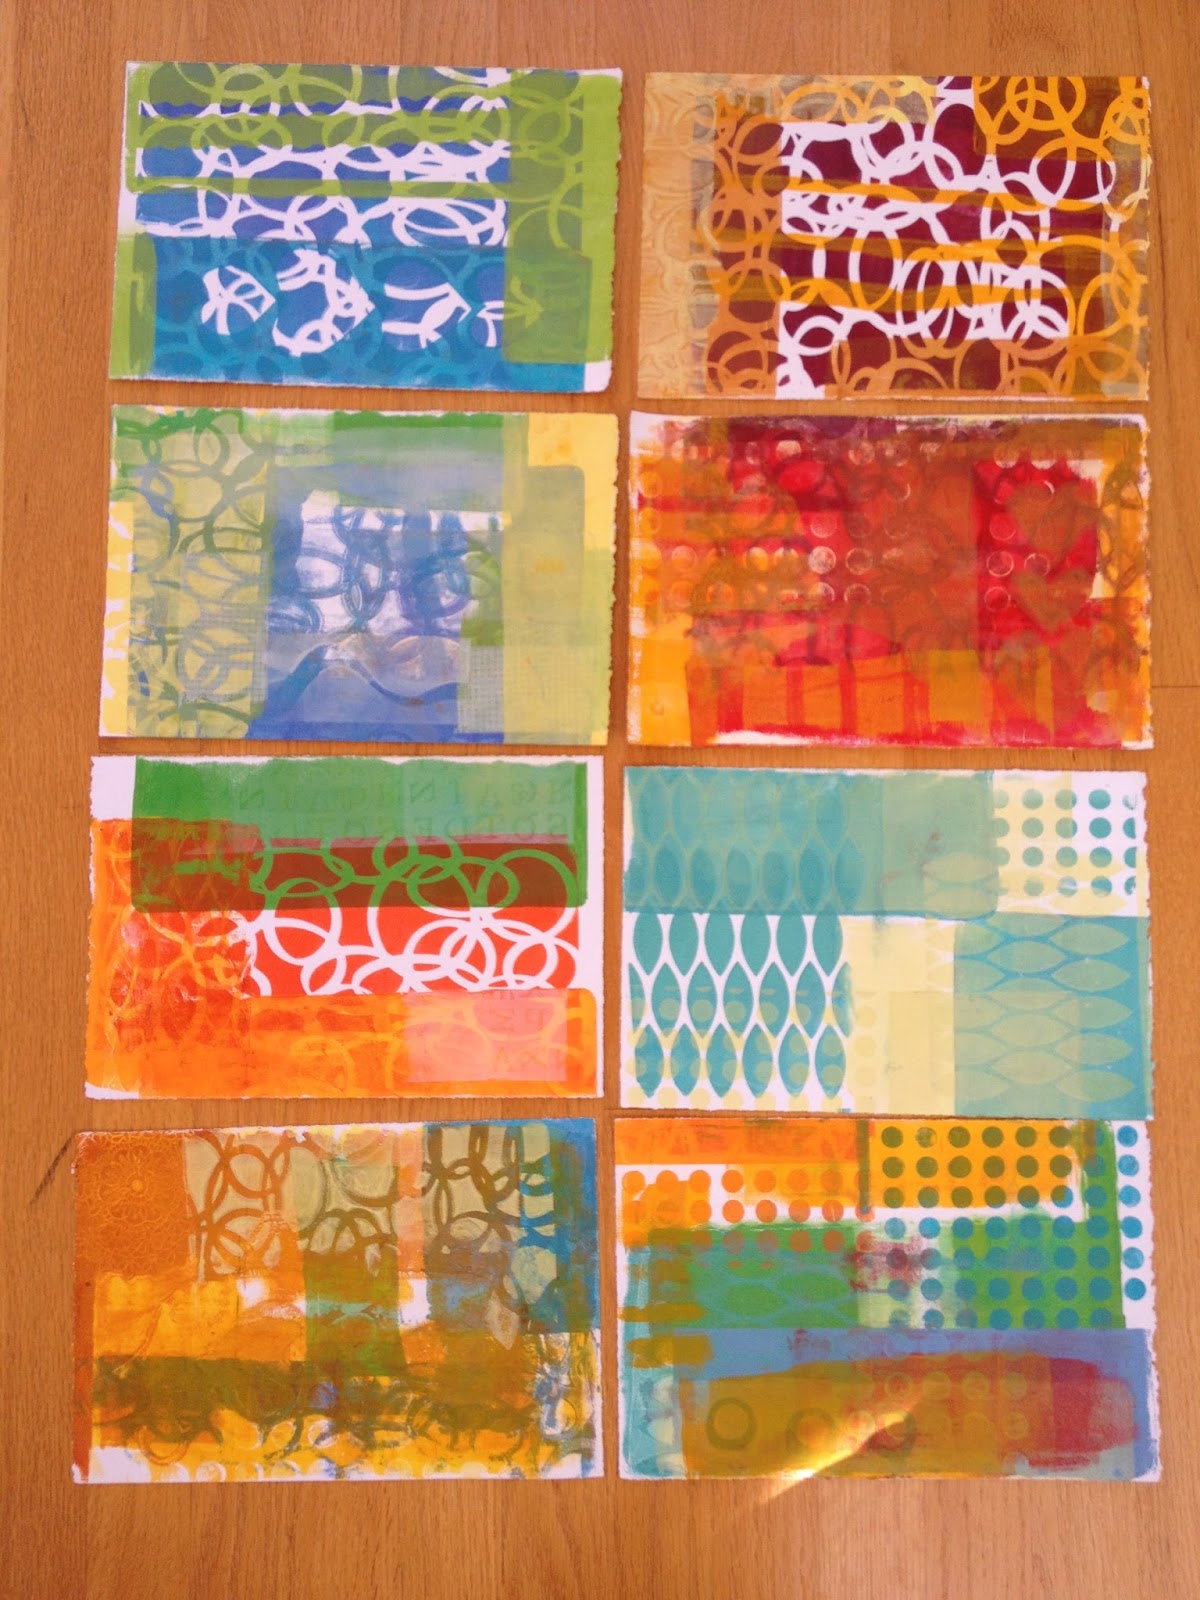
 Next we got to ply with  Gelli Plate - a rubbery thing you apply paint to with a brayer and then "print" onto heavy paper in random or deliberate ways.  You can see above i pressed 4 sheets of paper - into ONE layer of paint.
 Next you can add additional colours and use stencils to add pattern.
 Here are 4 completed works that Lucie did.
 and here are the 8 that i did!  i like some more than others.  But the idea is that you can cut them into postcard shapes and add additional paint or collage to create interesting little works of art.
 Speaking of little artworks - here was our next activity - Gypsy Cards!  Above are Lucie's.  Each of these 3" squares started life as a cereal box - or some other random packaging.  We created various collage materials using household items to make stamps of circles and dots. then we wrote "wishes" or goals on the back of each one.  throughout the day we added bits of paint and collage as we worked on other projects.
Here are mine!  i used a combination of black and white papers with circles stamped on them, plus some green and aqua tissue paper.  i garnished them with a rosy red border and little dots.  When we were all done we had to pick three at random to be our first set of goals. I suppose when i accomplish those i get to pick three more!
(or i might just frame them - i like how they look all together!)
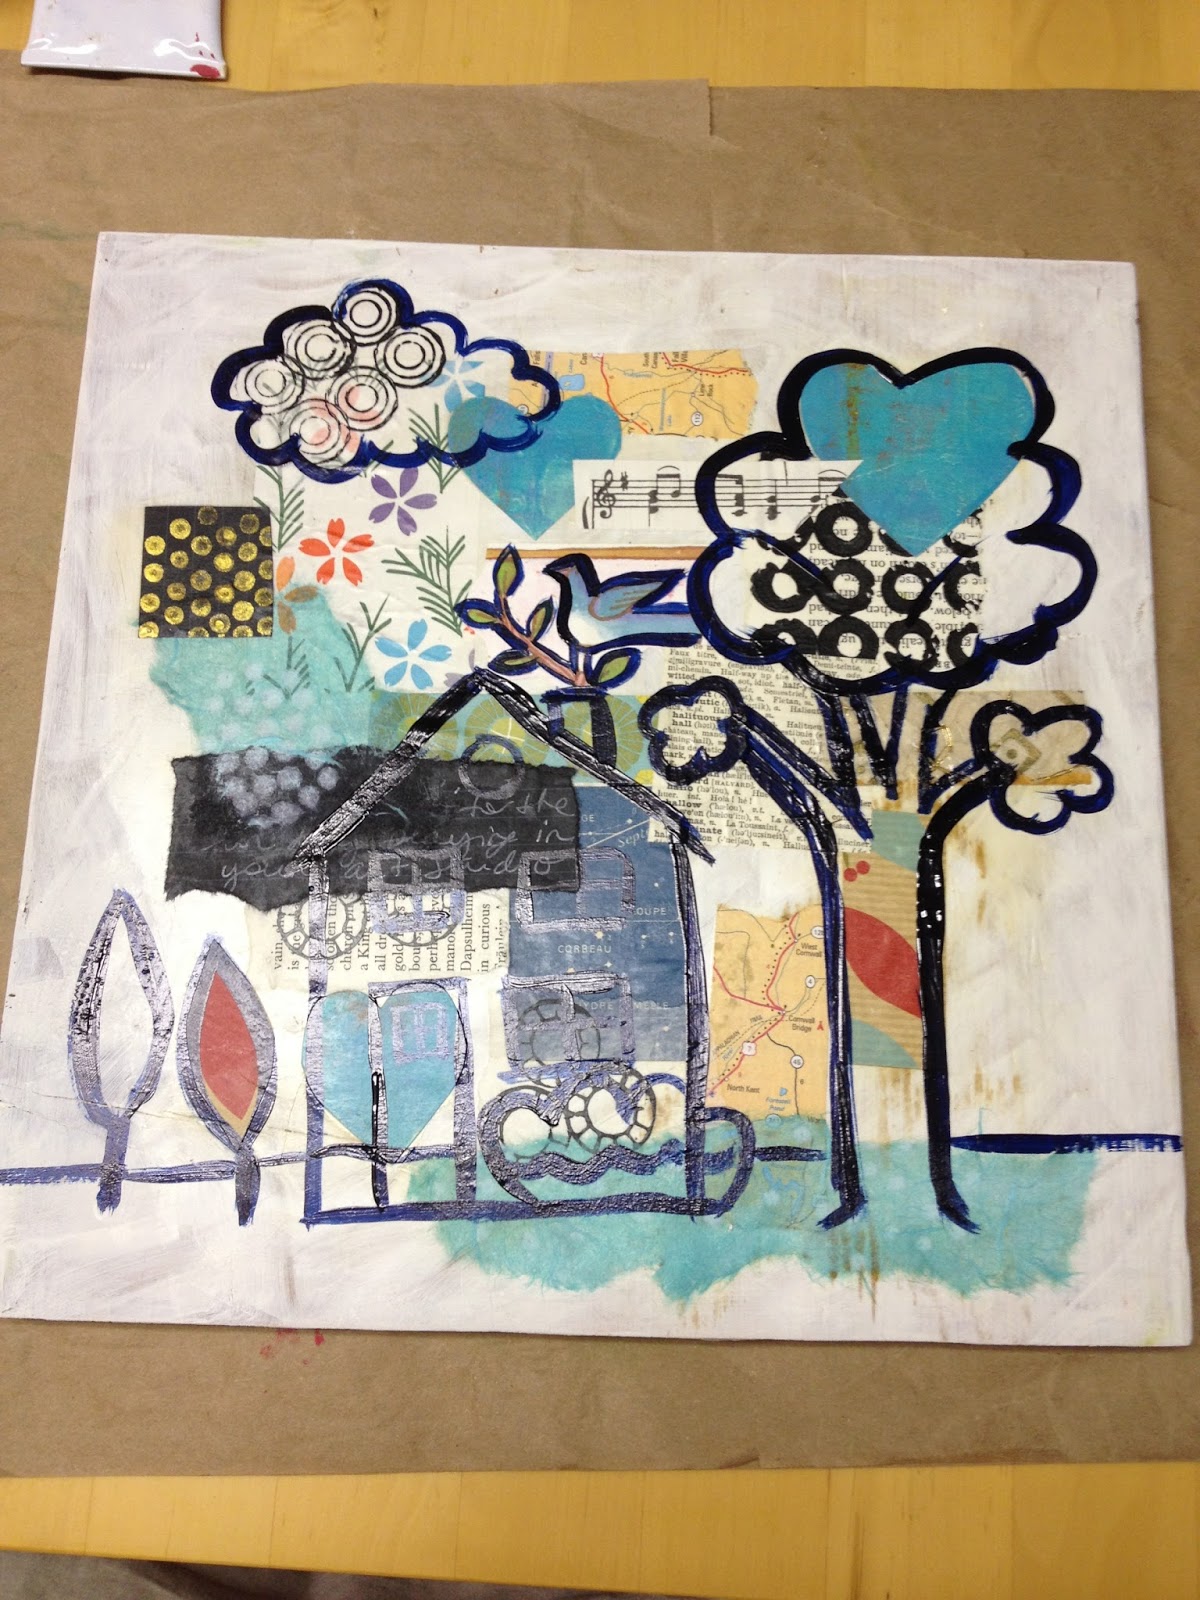
 Next we created an art collage on a white gesso'd wooden board.  The concept is that you just apply bits of paper and don't think to much about it. This was Lucie's.
 Next you try to see if an image appears.  Spin it around, squint, and user your imagination. With the geometric shapes and nautical colour scheme - Lucie "found" a sailboat!
 Next you paint the background - but leave your original collage show through.  It is all about serendipity - you might find something wonderful!
 Here is my original collage.  I actually liked it just like this!
 But i tried to find some images and a tree and little house emerged.  We outlined them in dark inky paint with a small brush.
 And here it is all painted in!  Why is the branch and bird sticking out of the chimney and not the tree?  well - it just didn't turn out that way and that makes it more charming, n'est pas?
 One more thing to share - we took a bunch of security envelopes and rolled on white gesso.  Then we added blue and green watercolours and let them dry.  You can rub and buff the watercolours to reveal the texture of the rolled on gesso. (but my gesso wasn't thick enough so it didn't really work)
BUT.... they were still interesting enough to fold and sew into pages.  then Lucie used her Zutter machine to bind  them into a book!
Thanks Lucie for a lovely artful weekend in your beautiful home!