Friday, October 31, 2008

Happy Halloween and other scary thoughts

I carved the pumpkin and made the goodie bags for the neighborhood kids. I loaded the dishwasher and cleaned the kitchen counters and vacuumed the den carpet.
(insert loud screeching car brake noises here)

WHAT???????????

Yes - i am home doing domestic chores, something i never do. Why you might ask? Because i lost my job this week. After moving to California 8 and a half years ago for this exciting opportunity, it all came crashing down on Tuesday, when the company laid off a third of their head office workforce. Some 130 people out of work. I suppose i take some comfort in that - knowing that it wasn't just me being singled out. My friends and former colleagues have been very sweet and supportive.
Many of them say the same thing: time to focus on your art. I have never considered myself an artist. A teacher, yes. A good crafter, yes. Pretty talented at using art as a jumping off point to create something with my own point of view, yes. But i never went to art school and never spent any serious time focusing on art. I really do need to get another job - but i do have some breathing room. So maybe I will. Maybe i will focus on art for a while.
My husband has been incredible making sure i have everything i need and space to figure it all out. Doesn't he know all i really want is for him to load the dishwasher and do the vaccuming? But then again, all great artists have to suffer don't they?

Thursday, October 30, 2008

Junk Mail Challenge

The second challenge for this week was to create something from junk mail. I was inspired by some prints i saw in a poster catalog where dog portraits were created using different types of paper. The artist is Karen Dupré. I thought i could find some simple drawings of a dog - like something a child would color, and do the same thing. Well doing a search of dog drawings either turned up something too detailed, or then way too cartoonish and silly.

I needed to find the right "cute dog". So that's what i typed into google images. I found this little guy. He's perfect. A nice assortment of coloring. A sweet expression. And a full face in the image.

Using a photo editing package that i know nothing about, i played around until i found the setting called "posterize". It sort of creates flat areas of colour. I am sure there are even better ways to do this. I started to cut out the shapes - darks, medium and light. I glued them into the BACK of my papers.

What did i use for paper you might ask? keeping in mind that this challenge was called "junk mail" i used the INSIDE of envelopes. Never looked inside an envelope? there is a myriad of interesting textures and patterns. usually in tasteful grey tones. These came from ONE batch of mail - you know the usual credit card applications.
Using the cut up picture as my "pattern" - i cut out a variety of pieces for the doggy's face. This can get tricky. I glued my pieces face up to the BACK of the patterned paper. So my final composition is the mirror image of the original. You have to do this so you can start with large blocks of colour and work you way to the smaller pieces. If you glue the patterned paper on TOP of the template - you won't see it anymore.
Try to use a variety of lights and darks and don't let the same papers touch if you can help it. I paid no attention to matching the envelope patterns to the shadows on the dog - so he comes across like a negative rather than looking realistic. But do whatever you want! Try it yourself!

FYI: This month's Somerset Studio has similar works by artist Peter Clark. His pieces often go beyond the confines of two dimensions and just blew me away. Please check out the magazine and his website for more great inspiration.


Wednesday, October 29, 2008

Trash Can Challenge

Ok - so here was the deal - take whatever you have in your craft room trash - and make something out of it! Thanks Marie for suggesting this fun and creative way to get us working with found objects, aka scraps, rather than my carefully sorted and filed supplies! We were tasked to create something with what we found literally in the garbage - allowing us to use one thing from our studios. I started by dumping the bag (i just recycle plastic bags - hooked onto the drawer of my worksurface) out onto the desk in our office. That way - i would not allow myself to "steal" all the real art supply goodies from my studio. Well let's just say there were slim pickings! Mostly packaging - not a lot of interesting stuff.
But two things did emerge: orange and black. How apropos for halloween week! The orange was the labels from some dick blick canvases and the back of a big lots receipt. The black came from the backing for a package of bird stencils i purchases recently. Interestingly the black backing was covered with skull and cross bones - interesting logo for a stencil company, but it was really faint and doesn't show in the finished product - but would have been cool it is did! I did scratch up the shiny surfaces with a sanding square that was also in the garbage!

I started by sorting all the bits into piles to see what i had to work with. The dick blick labels became two overlapping pupkins. A catalog page sofa became the eyes and a scrap of black paper the mouth. I used a page from the phone book to make a pointy border for the piece. Old phone books are great to use as a surface to glue on on your craft table. When it gets too sticky - just turn the page.
Some bits were serendipidous - like the label for a package of mini eggs was printed with a green leafy vine and two doves. The sticker backing for a a border of stars became partnered with a clock moon, cut from a catalog page scrap. Some strips of floral paper were used to create stripes on the pumpkin.

The final touch, and allowed by the "rules" was to take some portfolio oil pastels and smear some colour all around the edges to blend it all together.

Thursday, October 23, 2008

Personal Art Challenges - fun for all!

I am in an online yahoo group that swaps atc's and altered journals. Today the hostess posted two online challenges. Two really fun ideas anyone can try. The first is to create something out of the stuff in your art studio/craft room garbage can!
Lord knows the treasures that lurk in there. I'll keep you posted with what i end up making. Too late now to start digging through my garbage!

The second challenge is to create something from junk mail. I did this years ago in an altered book swap. I was sitting in front of the tv set going through the mail and thought - hey - why not just use what i have here? I have actually done this a few times.
The picture on top was made exclusively from a Target flyer. As you can see it had wonderful graphic images. these were on different pages in the flyer - but i created by own layout by putting them together. I think that is part of what we altered book enthusiastes enjoy doing - sort of pretending we are magazine editors or advertising creative staff - doing our own layouts and photo spreads. We get to decide what goes where on our pages for maximum effect.
This next set of pages were done in an altered dictionary round robin. The idea was to create a spread based on a word in each letter of the alphabet. Can you guess the word? Answer below!
The pages were actually three separate spreads with a peak hole in each to the next - each time revealing a bit more of what was beyond. I sat in front of the TV set and cut up ads and junk mail into little triangles and geometric shapes and then pasted it all together.
This spread was done in a calendar round robin. You would work within the theme of the calender -you know the type - spiral bound, with lots of illustrations. This one had all these sassy gal images travelling and shopping throughout the seasons. I just used a bunch of necklaces cut out of a catalog. rather than cut them out (those beads? i don;t think so!) I scanned them into the computer, and printed them on a transparency. Then glued it on the page - just because the colors and the flowers worked with the image - no other reason. Working in these calendars taught me to just be spontaneous and go for it. Not to spend too much time over thinking the spreads. You can see i added those "buy me, gift idea" stickers they put in Domino magazine - again - just because the colors were perfect.
Oh - the secret word? kaleidoscope!

Sunday, October 19, 2008

Sunday is my funday...

What a great day. I taught a beeswax collage class to one student, who has taken the class before, who is a member of my altered book monthly swap group. SO let's just say it was completely without stress or work of any kind. We both passed a lovely 4 hours just collaging and working with sweet smelling melted beeswax.
That's my piece above and here is Carol's. I like the simplicity of her placement. Mine is a bit messy.
Anyone out there want to take a fun and relaxing class? Please contact Scrapbook Territory to sign up! I'd love to have you! Coming up in november is the altered book keepsake box. In December is the cigar box assemblage workshop.

After the class my monthly altered book group met. Just the four of us. We did a show and tell of the pages we did in each other's books. Next we shared various projects we created in the past month. Then we each created an 8x10" canvas collage featuring a wonky house in the style of Lisa Kaus. We used assorted printed papers to create a background, the house and roof. I printed an assortment of large clocks from GOogle images for large moons. A thin application of gesso ties it all together. Portfolio Oil Pastels are used to create the shading and coloring and the birds done with a stencil. We added number - some big some small for a whimsical touch. You can see that Dorothy (#39) and I (#5) went dark, while Carol (#8) and Shelley (#3) went lighter. It is interesting how you can take a concept and go so many directions!

You are Invited....

...to a Party Theme altered book! Well, i was anyway. Carol, from my altered book round robin, created a festive gold covered book with the theme of Parties. Create a spread with the party theme of your choice - real or imagined. As much as i would have loved to create the ulitmate gathering with expensive caterers, and a luscious exotic locale, i chose instead to recreate on paper two actual parties that i hosted years ago for my neice and nephew.
This was back when i lived in the same city as my sister. I gave all her kids parties until she moved away. Now she does something horrid like order pizza or send the kids bowling.

Anyway - there were many great events to choose from. Should i pick the "buckeroo is turning two" western theme? I even sent Jim to buy a hay bale for that one. Or the pirate theme complete with a cardboard schooner that sailed to a treasure island. Well - my den sofa piled with cushions did a good job of hiding the buried treasure! Or what about Daniel's "I hate Barney" celebration - complete with Barney road kill cake (like trifle with purple cake, green whipped cream, cherry pie filling "guts" and black licorice in a tire skid mark across the top.)
Instead i chose Erica's first birthday and Evan's third. For Erica's party i chose an angel theme - and set the stage with a cloud like atmosphere. I had a full bolt of tulle from my sister's wedding - so i used that to literally encircle the living and dining room. I hung gold stars and angels from ribbons. All the food was white or close to it and of course the birthday cake was angel food!
I cannot remember what i did for an invitation - this was before i had access to a color printer - but my pages reflect as much as i can remember of the event. There is angel patterned tissue paper crinkled up with a border of tulle ribbon. Some victorian scrap sun, moon and stars decorate the page. As i recall i gave away glow in the dark stars in the goody bags. The menu is written on the back of the cut out angel.
For Evan's third birthday, i chose a Nature Safari theme. I bought all the decorations, gifts and party supplies on a business trip. I remember calling the front desk of the hotel and asking for a box to bring it all home. i think i went crazy at the Discovery Store or Nature Company i forget which. I decorated the house with paper leaves and lots of sunflowers. We played musical chairs with lily pads instead of chairs - making the kids hop around like frogs until the music stopped. But the highlight of the party was the butterfly catching contest held in the basement - where i had strung up large paper butterflies on elastic string with magnets - so that they could be "caught" in a butterfly netting bag. They were hung on a pulley system - so someone could make them "fly" while each child took turns trying to "catch" them.
For my pages i used a colourful blue and turquoise wrapping paper with butterflies. then added bugs cut from tissue paper and then some frog and bug stickers. I used three flaps cut into the middle page of the spread to highlight the games, the menu and the goody bag. That was my favorite thing. I took mason jars and filled them with things that looked natural, that a kid might collect our in the garden - but were all edible. Green licorice created grass, gummy worms, chocolate bugs and some stickers. I covered the opening with mesh (so the bugs could "breathe" and tied it off with green raffia. That's Evan and my friend's son Ryan getting ready to bag some butterflies, shown on the page dangling from thread.
Oh - i should mention that huge "E" is from Tim Holtz's grungeboard alphabet. I just love the large scale of the letter. I added some color with green ink pad and them some faux stitching with a turq sharpie.
I wonder if Evan remembers? Now a way cool 15 year old i doubt he would be impressed...probably prefer pizza and bowling.

Monday, October 13, 2008

Go Make Something Challenge: Faces

Here is my entry for the Go Make Something challenge which this week is Faces. I thought - what a perfect opportunity to use some of the head shots from the Photo Booth Babes collage sheet from Ten Two Studios. I had previously covered 4 mini canvases with aqua and brown tissue. I added a square of brown mulberry paper for a frame for the 4 faces. I chose a victorian lady with three hatless poses and one with a hat. So why not add some hat pins? and some lace, and some buttons, and a spray of millinery flowers, and a lace doily and some vintage french postage stamps? Well there you have it! A lovely quad of pretty faces!

Mixed Media Monday Challenge - Blues and Purple

I haven't done a challenge in a while - so i thought i would dive right it!

Mixed Media Monday's theme this week is "blues and purples". I did a collaged notebook cover.

These are fun to do - because you end up with a nice piece of art that has a practical use! Not that i will ever use this, mind you. But i could, maybe?
Someday? Anyway - isn't she sassy? Reminds me of Joan on Mad Men.

I started with some swirly striped tissue paper as a background. That dictated a more contemporary feel. I looked through (my recently sorted) images for a suitable subject. I found this gal from a fashion magazine. She was black and white - so i could colour her anything to make her fit the theme. I ended up creating a purply blue cocktail dress out of dot scrapbook paper for a skirt and scrunched up tissue for a bodice. The original was actual feathers! A few sparkly bits complete her outfit.
I added the sticker stars for a vegas nightclub effect and the words "hot stuff" and "sizzle".

Beeswax collage anyone?

Please join me this Sunday at ScrapBook Territory in Berkeley CA for a beeswax collage workshop. We'll be doing the hinged canvas project. Here are two samples i did in class with a bird theme.


We start by taking coordinating papers and prepping them to fit the two 8x10 canvases. We create a niche on one side to hold 3 dimensional found objects. Everything is attached to the canvas with melted beeswax. The aroma of the wax creates a warm calming artistic experience i am sure you will enjoy.

Here are some awesome student samples:


Sunday, October 12, 2008

yum

Can you say comfort food? Not that this has anything to do with altered books - but i did want to say that i DID make the baked rigatoni with squash, sausage, and kale i mentioned last week - and it was delicious!
Here is my table setting, the lovely composed salad with pear and curry vinagrette and the casserole. Here is the link to the recipe again. Cutting up butternut squash is a pain. My mother reminded me that you can bake it just cut in half - and then it is easier to cut into chunks!

Another painterly weekend

Well, my husband was out of town this weekend - so i had no excuse not to get busy doing something fun and creative. I started off going crazy at a art supply warehouse sale - Savoir Faire - an importer of Sennelier pastels and Fabriano paper was clearing out excess stock - practically in my own backyard! I never even knew they existed - and right here in Novato.
Well my neighbor Z and I got there around 9:45 and clearly had missed the early bird rush. there was a sea of middle aged ladies - i guess every middle aged lady in the county is an artist? anyway - there was still a lot to choose from. I bought pastels, charcoal, two packs of jumbo sized mulberry paper, some japanese note paper and envelopes, and some paint brushes and other goodies.
They also import a line of felted accessories from Nepal - so i got two adorable purses and some wool pom poms to do with i don't know what. But something cute.


So all this art supply exposure was bound to inspire me to create something. I had a plan. I had two large canvases in the garage collecting dust i wanted to transform. They were painted years ago when i was just starting out and was in my "musician" period. Now i am in a blue period and obsessed with birds - so why not paint over them?
So i did. I used the paint samples from our living room makeover this summer for the backgrounds. We tested three shades of robin's egg blue and chose the one that is the most grey blue of the three. I kind of regret not going with more of an aqua, but we agreed at the time is was too pretty for a living room. But i still love the color so why not start with that.


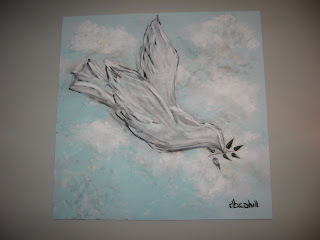
I saw a painting in Elle Decor magazine i wanted to try, shown above. It is by Kathleen Markowitz. Her website has nothing like this piece, mostly dark abstracts, so i could not get a better view of this painting. So i googled dove drawings to get a better idea how to paint one.
First step was to paint the clouds. they look easy but can be so hard to get just right. I started with wisps of white paint, then added some grey, then some aqua to create depth. A touch of ochre too. They just kept dabbing on paint until i liked the effect. Having a gallon of the background paint made it easy to go back in and cover anything i didn't like.

Eventually they started to look somewhat realistic. Next came the big moment - painting the dove. In the inspiration piece the bird was quite ethereal.
In a way that makes it harder to draw - it is great for a master like picasso to do a simple line drawing of a dove - but if i do it, it will just look childish. And therein lies the challenge of the amateur artist. Does my work look impressionistic or just bad?


Some of the dove images i saw on-line included an olive branch - so i thought why not add one. I plucked some leaves off a vine (as you can see i was working on my patio) and glued them onto the painting with gel medium.
ta-da!


For the next piece, i wanted to re-use the idea of insetting something into the canvas, as i learned in a worshop i took with Carine, i wrote about here.
I have a bunch of fake bird nests and eggs - and i thought how cool to cut a hole in the canvas and stick it in, creating a three dimensional effect. I cut an x with a sharp utility knife and then more slits until a rough circle was cut. Go easy - you don't want your cuts to be too big. I put globs of gel medium on the triangle points and pushed the nest into place.


Next i went looking for some wire. In my mind i wanted rusty barbed wire - to give the piece some juxtaposition between the softness of the eggs and the hardness of the wire. But i could not find any in the garage. (seriously - it isn't like my husband is a ranch hand and keeps extra fencing materials next to the christmas ornaments - but it didn't hurt to look) I did find some copper wire - that at least was easy to wrap around the canvas. I painted on three birds. They looked really dumb. I must have done something wrong. back to google to find images of birds on wires. I had made the tails too wide and the heads to pointy. A bit of touch up paint and they were perfect.
Next i added a bit of extra twigs around the nest to make it look more painted on. It really does look painted - you have to get close to see it is a real nest!


Here it is hanging over the living room sofa. It looks stark in the photo - but looks cool in person. What do you think?