Tuesday, March 23, 2010

Mixed Media Monday Challenge - Vintage Children

Do I qualify as vintage?  Interesting question. The challenge this week on the Mixed Media Monday challenge is "vintage children". I have chosen  to post the two original covers, front and back, of a numbers themed round robin swap i did a few years ago.  Since they were created before this blog, they have never been seen in cyberspace!
The group of 8 artists each had to create two pages 5" by 8" using our assigned number.  I chose my favorite number two.  Also my birthday.  We could use as many chunky elements as we wanted - because we would make high quality colour copies that we shared with the group.  We made hand bound books to hold all the artwork.  it was part of a series of books we did one summer - with colour, numbers and letters and the themes.
Anyway - the little ballerina in the photo above is me in 1969 or 70.  Old enough?


In case you are interested here are all the references to TWO in the above collage:

  • pas de deux (a french ballet term)
  • the watch is set to 2:00
  • The sheet music is Heart and Soul and has two sharps.
  • it is often played on piano as a duet
  • there are two sets of wings
  • two degas ballerinas
  • the words 2 dream
  • a dictionary scrap with the words deux and deuxieme 
  • and finally two angels.

Easter Card from Scraps!

  My friend Z. wrote to me and asked - what did i do with all those strips of scrapbook paper last spring?  Did i do something with them around easter?  She had created a project that required her to cut thin strips OFF the pretty scrapbook paper she was using to cover some file folders, and had a recollection that i did something with them a year ago.  Then I  received this lovely note card from her in the mail!  
Well i could not remember.  I moved just before easter - so i did not think i had created a special easter project.  But she was right!  I created THESE cool little collages last March.
Z. remembered the eggs and nest in the top corner and used it as inspiration for her lovely easter card!

So save all your scraps ladies! you never know when you'll need them for a project!!

Petite Inspiration Box Swap - Nesting Edition

I am delighted to be participating in my first Match Box Swap.  I first learned about this on Amy Power's website Inspireco.  I took a class with Amy last year and made this adorable wreath.  I read her blog every day - just to see what she is up to.

Well read about her valentine swap HERE.  You will be amazed at the cool things her trading partners managed to fit into those large matchboxes. Check out some other boxes at our hostess Heather's blog Specked Egg  HERE and HERE. So when i heard there was going to be a new swap with a bird's nest theme - well, i could not resist. 
I made these little birds out of air dry clay and painted them assorted shades of blue.  I was inspired by the little birds Amy made for our wreath workshop. You can see the one Amy gave me on a wire coil coming out of the house on the wreath above. Her's was way cuter - with the little party hat!

I also made and painted a bunch of little speckled eggs.
Last night i picked up three large boxes of wooden matches.  I will paint, collage and embellish these boxes to hold all the spring/bird's nest themed items i will place inside for each of my swap partners.
I laid out all the goodies on the dining room table to see how they looked. ahh - not so fast - you nosy parkers!  I shaded the image so that you can not see my colour theme or really identify most of the items! Let's just say they are going to be AWESOME!!!


Now then....what do we do with all the matches?????

Altered Calendar March

I showed this to you a few weeks ago - it was the first page of the March Calendar in the 2010 Calendar Girls round robin project.
I also showed you that this book was filled with trashy romance novel cover illustrations.  But Marie, the originating artist, had requested that we alter the pages to make gardens!
To prep i painted white gesso all over the calendar-y sections so that the only the blond lady was left in her black negligee.
Well, this is how the spread was transformed!  I tore some pages of lavish gardens out of a Martha Stewart magazine.  (i used to treasure my MS magazines- saved them for 15 years - then when i moved i gave them all away.  Now i can gleefully rip them apart without remorse!)
I added some soft scrapbook paper for the trees and sky above the hedge.  Then realized the trees were BARE and it was clearly the middle of summer - judging by the blooms - so i had to hand paint in leaves on all those branches!  I over-painted the blond and gave her a new dress made out of an Anthropologie catalog shower curtain.  A nice big yellow daisy makes a sun hat and i added a whimsical phrase:
Please come into my garden
I could use a handsome man like you around here.
Do you know anything about weeds?
This next spread started out with a sultry vixen leaning against a tiki bar.  I decided to give her some exotic asian inspired surroundings.
I added some asian script paper in white and red in sort of banners.  then i layered on some large succulent plants on the left and a large black bonsai tree on the right. Marie had included some shiny origami paper with the calendar - so i incorporated some squares to evoke stepping stones. I added three large butterflies and two strings of hanging lanterns. a bit of white paint along the edge makes them look  "lit up" - but it is hard to see in the scan.
Finally on the last "half-spread" i just grabbed some beautiful sepia roses from a calender.  I layered them on top of a page from a garden book about roses.  And slid in a romantic couple.  Just a touch of brown vintage lace seam binding as a final touch.

Thanks Marie for the time with your fun calendar - i wonder what the theme of the next book will be?  I will be altering April. Easter theme anyone....?

Sunday, March 14, 2010

What did you do today?

I made a flock of wee birdies.
I was going for a streamlined modern along the lines of Jonathan Adler:
Just little whimsical birds - i'll probably paint blue. They are each about an inch long - or less.
I also made a batch of eggs:

I wanted them to be sweet looking.  I will be giving some away for a bird themed swap i'll be doing next month.
I used the air dry clay i talked about HERE

Monday, March 8, 2010

Mixed Media Monday: Its Not All Black and White


The mixed media monday challenge this week is to create something predominantly Black and White. I chose these dashing guys, taken from a photography book.  They are from France at the turn of the century.  You know the century BEFORE the last one, actually.  I am not sure if they are clergy or barristers or learned gentleman.  But i layered them on a page of "vetements ecclesiatiques" from an old French school book.  The quote is one of favorite lines from The Birdcage.  "Well, one does want a HINT of colour...!"  In the movie it refers to when Albert is trying to dress like a man - in a dark suit with bright pink socks.

Sunday, March 7, 2010

Altered Calendar - March Gardens


I received a new Calendar to alter as part of our 2010 calendar swap.  I get to keep this book for about a month and can collage the pages according to the theme.  I can do some journaling - or just create pretty pictures.  The pretty altered cover and the first few pages with Victorian ladies and flowers belied the true nature of the calendar.
AHA!  The book was filled with trashy romance novel cover vixens!
Marie explained that we were to create pages of gardens - incorporating these lusty wenches into a theme of our choosing.


I started by gesso-ing the artwork around the females to have a blank slate to work with - like this. I think she might look good in a tiki garden or something with a Cuban flare.


The first page of March had no wench to work with so i set upon creating a garden of eden or something - someplace for this marble statue couple to enjoy nature. Au naturelle. 


I did the whole spread with a few pages of prepainted deli paper from my stash.  I was inspired by the latest Anthropologie catalogue, which used paper cuts to highlight their accessories.  You have to check them out, the collection is called Carried Away - so pretty.


You can read about my deli paper HERE and HERE.  Did i mention it glues beautifully?  It does! I like using it in altered books, rather than painting directly on the pages.
Please check back to see what gardens i create for the two lonely ladies above!

Paper Garland

Back in December i saw an interesting paper ornament shape i wanted to try - it was a sort of modern twist on the construction paper garland you all made in elementary school.  I never got around to making it for Christmas, but i did show it to my niece.
She just finished making a whole bunch of them to hang around her Craft Corner. Aren't they pretty? Check out more pics on her blog.


Here's how to make them - although - you could probably make them any size you want!  Cut strips of paper about 2" wide.  For each ornament you need one 6" long, two - 8" and two - 10".  
Make a paper sandwich with the shortest piece in the middle - surrounded by the two longer pieces, one on each side.


Line up the ends and staple together.  I did 4 small staples - but one normal size would probably do the trick.


Next smoosh all the papers so the the BOTTOM ends align.  This creates the shape.  it is WAY easier to do this than it is to explain, or photograph!  Staple the bottom ends to hold it all together.  This is also much easier to do with card stock.  Soft paper works, but it is more squiggly.


Here you have one completed ornament!


I used dictionary paper, off white handmade paper with natural flecks, and solid brown craft paper.  The brown and natural paper actually came PRECUT into strips - in an assorted pack of cardstock remnants.  Look around - you probably have a stash of paper strips from other projects - that were too good to toss!

My niece hung her ornaments one on each string.  You could also hang several vertically.  But i chose to make a garland out of mine. I punched a small hole in the top and strung some martha stewart natural and white twine through the holes.


I like the neutral colours against our white painted stone fireplace.


Here's how they look with the full swag. I think these would be really pretty hung over a mirror or a window.
  

Thursday, March 4, 2010

Mixed Media Monday Challenge - Enchanted


Here is my submission for this week's Mixed Media Monday Challenge.  The theme this week is "Enchanted" - leaving the interpretation up to each individual artist, of course!
I knew i wanted to use a couple and the night sky, because i could not get ...Some Enchanted Evening... out of my head!
My Uncle Jussi used to always request that song when we were at events where my husband's band played - in a heavy Finnish accent. We got a kick out of that.
Anyway - while looking for romantic couples, i came across Little Red Riding Hood here, with her wolf buddy.  In Vogue magazine of all places. I cut them out and prepared a background.  A night sky printed scrapbook paper gave me the perfect moon and stark trees.  I coloured the moon a golden hue.  I also coloured the maiden's hair blond, since Vogue magazine thought it would sell more dresses if her hair was GREY.  GREY.  The cool thing is that grey hair is easily colourized with a yellow marker.  She didn't have a hood, so some red roses did the trick. The basket of apples is WAY out of scale - perhaps creating perspective?
The French dictionary paper has the words Enchante and Enchantement and Enchanteur - which apparently means someone who charms or seduces - how cool is that?
Please check out the comments section on Mixed Media Monday for more cool enchanted art from around the world!

Monday, March 1, 2010

And now for something completely different....

A few months ago i got together for a play date and visit to the flea market with some co-workers.  We made cards and tags shown here.  Yesterday we did something i have never done before!  We made sculptures out of wire and clay and papier mache.  Our work was quite varied.

I am most proud of this majestic bird.  I started with a big wad of newspaper and made a very simple wire form.  I used med gauge wire - making a rough body, legs, tail and head. There is a silly collar of fine copper wire around his neck.  
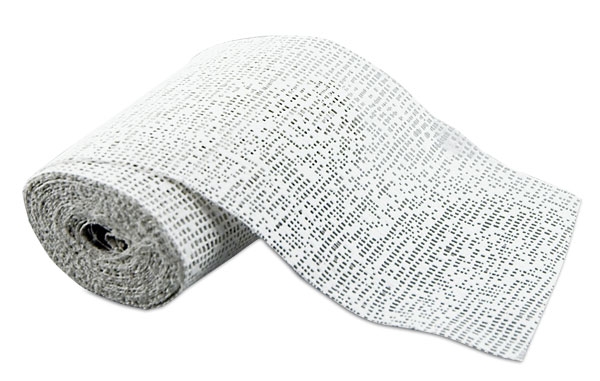
We used plaster cloth like this to make some of our sculptures.  WE LOVED this stuff!  So easy and fun to work with.  You cut strips or squares and dip it in water and lay it on your base.  you can spread the plaster around to get a nice smooth surface.
The hardest part was getting my feet to support my heavy bird.

These are two little birds i made with air dry clay.   They are perched on top of candle sticks - i was thinking of maybe making "nests" for them to sit on.  I also made holes to add twig or wire legs - so not sure what i'll do with these little guys.
I have used other air dry clays with mixed results.  This one dries a little grey, but has a nice weight to it.  it is nice and soft and easy to mold.
So i made this too - not really sure what i was going for - sort of an aardvark in a figure skating pose?  This one was made with just a wire frame wrapped with the air dry clay and then etched with a modeling tool to give it "feathers" or to look like it was carved from wood?  Just imagine it painted a frivolous colour, maybe a tutu and with little skates on her feet?
Here are some of the very creative things created by my friends:

 R. created three letters (two shown here) to give to her nieces.  She made simple forms from folded newspaper, wrapped with fine wire for a bit of support then wrapped with the plaster cloth and painted.  She will probably add some fun embellishments for the girls.

J. made this very interesting baby bird! Not quite finished, but isn't it cool? Porcelain doll head, plaster wrapped body over newspaper, clothespin legs.

N. created this, well, we're not sure what it is exactly, but we decided it looks like a polar bear with a very interesting nest of treasures on his back. She extended the plaster right onto a wooden base.

This is J.'s creation.  When we did tags and cards before Christmas - all her designs included a secret pocket. She carried that theme forward here creating a key holder with secret compartment on the bottom.  Those "knobs" are chess pieces covered with plaster and clay. the keys along the  back are glued then secured with the plaster gauze.

As you can see we had a very creative day. To top it all off the Canadians won the hockey game!! Thanks N. for hosting a fun play date.