The artful world of a mixed media artist and instructor in Northern California.
Monday, June 16, 2014
Altered Book Swap - Cherry Red and Teal
I just finished working in D's latest altered book - Cherry Heaven Teal. She created a beautiful altered book for our 2014 colour swap using a book titled Cherry Heaven. She added two vials attached with wires, each filled with colourful beads.
Here is an example of one of her deep and richly textured spreads. D. really loves texture and colour to create interest in her altered books.
For my first spread I chosen to do an Asian theme. I dug out my folder filled with Asian themed papers and illustrations and found these ornate gold doors.
Open the doors and inside are more exuberant Asian interiors. all featuring the theme colours red and teal.
Here is another portal- using a red chest with an Asian medallion.
Inside is a pretty figurine holding a little butterfly.
Here is another look at the left inside flap - with a collage of origami paper, a Japanese sticker and a bird and cherry blossom branch cut from wrapping paper.
For my second spread I started with a background of a legal stock document with bold red scrollwork. I added a marble statue face on the left, and a series of renaissance images on the right. I was playing with profiles. Four faces - 4 eyes.
The faces flip open to reveal a little red bird atop a pedestal. I added the words cut from a catalog - "Captivating Curiosity".
Here is a shot of the beautiful sign in page D created in the back of her book. On the right is a niche containing a small religious statue, surrounded by paper flowers.
And finally here is my sign in tag - more Asian papers and another bird!
Check out the other books in this years swap Here:
Pink, Green, Purple and Bling. We will start over again for the second half of the year.
Labels:
altered book,
asian,
color,
colour,
niche,
red,
round robin,
sign in,
swap,
teal
Thursday, May 22, 2014
Bling - Altered Book
This month I had my friend S's book to work in - BLING! She created a black and white and sparkly book from a binder style bound book with assorted printed pages. Love the lavish use of stones and metallic.
We were asked to create spreads using black and white (or cream) and to add some bling - hence the name. Here are the little sign in cards - we were to decorate and sign a blank card. I clipped a bunch of black and white graphics from decorating catalogs.
For my first spread I was drawn to this gentleman with a striped suit. I thought he should look over his shoulder at some femme fatale. I placed this lady in white beneath a striped tent and glass star lantern. I stenciled the background with gold ink pad and a stiff brush. the ruffled ribbon was the perfect striped final touch to add texture!
For my second spread I found these two ladies in black gowns in a magazine. I thought they'd look great with a zebra to ride! I collaged the background with some dictionary text and copper snail tape. then added some words clipped from a Ralph Lauren ad - a bit of creative poetry. I added some black tulle netting to the gowns to add some volume. and some swirly copper adornments to create bigger headwear. then some jet black stones to create a yoke and reins for the zebra.
To see the other color themed altered books from our 2014 round robion swap, click here:
PINK, GREEN, PURPLE.
Next up - Red and Teal!
We were asked to create spreads using black and white (or cream) and to add some bling - hence the name. Here are the little sign in cards - we were to decorate and sign a blank card. I clipped a bunch of black and white graphics from decorating catalogs.
For my first spread I was drawn to this gentleman with a striped suit. I thought he should look over his shoulder at some femme fatale. I placed this lady in white beneath a striped tent and glass star lantern. I stenciled the background with gold ink pad and a stiff brush. the ruffled ribbon was the perfect striped final touch to add texture!
For my second spread I found these two ladies in black gowns in a magazine. I thought they'd look great with a zebra to ride! I collaged the background with some dictionary text and copper snail tape. then added some words clipped from a Ralph Lauren ad - a bit of creative poetry. I added some black tulle netting to the gowns to add some volume. and some swirly copper adornments to create bigger headwear. then some jet black stones to create a yoke and reins for the zebra.
To see the other color themed altered books from our 2014 round robion swap, click here:
PINK, GREEN, PURPLE.
Next up - Red and Teal!
Wednesday, April 23, 2014
Kwick Kitchen Kurtains
I took one look up and the valances in my sister's kitchen, and said - i think you need a refresh. she had some very lovely striped curtains i made for her, like 14 years ago, for her first house. I thought she could do with an updated look. A quick visit to the fabric store for this lovely paisley, with aqua and greens was just the thing to brighten up the room.
I had some leftover fabric - so i made a little table runner for the center of the table.
Terrible picture - sorry, the late afternoon sun was coming in so strong - it was impossible to get a good shot! but you can imagine that the curtains are nicely accented by the green and aqua decorative items on the counter over her kitchen sink.Faux Silk Flowers
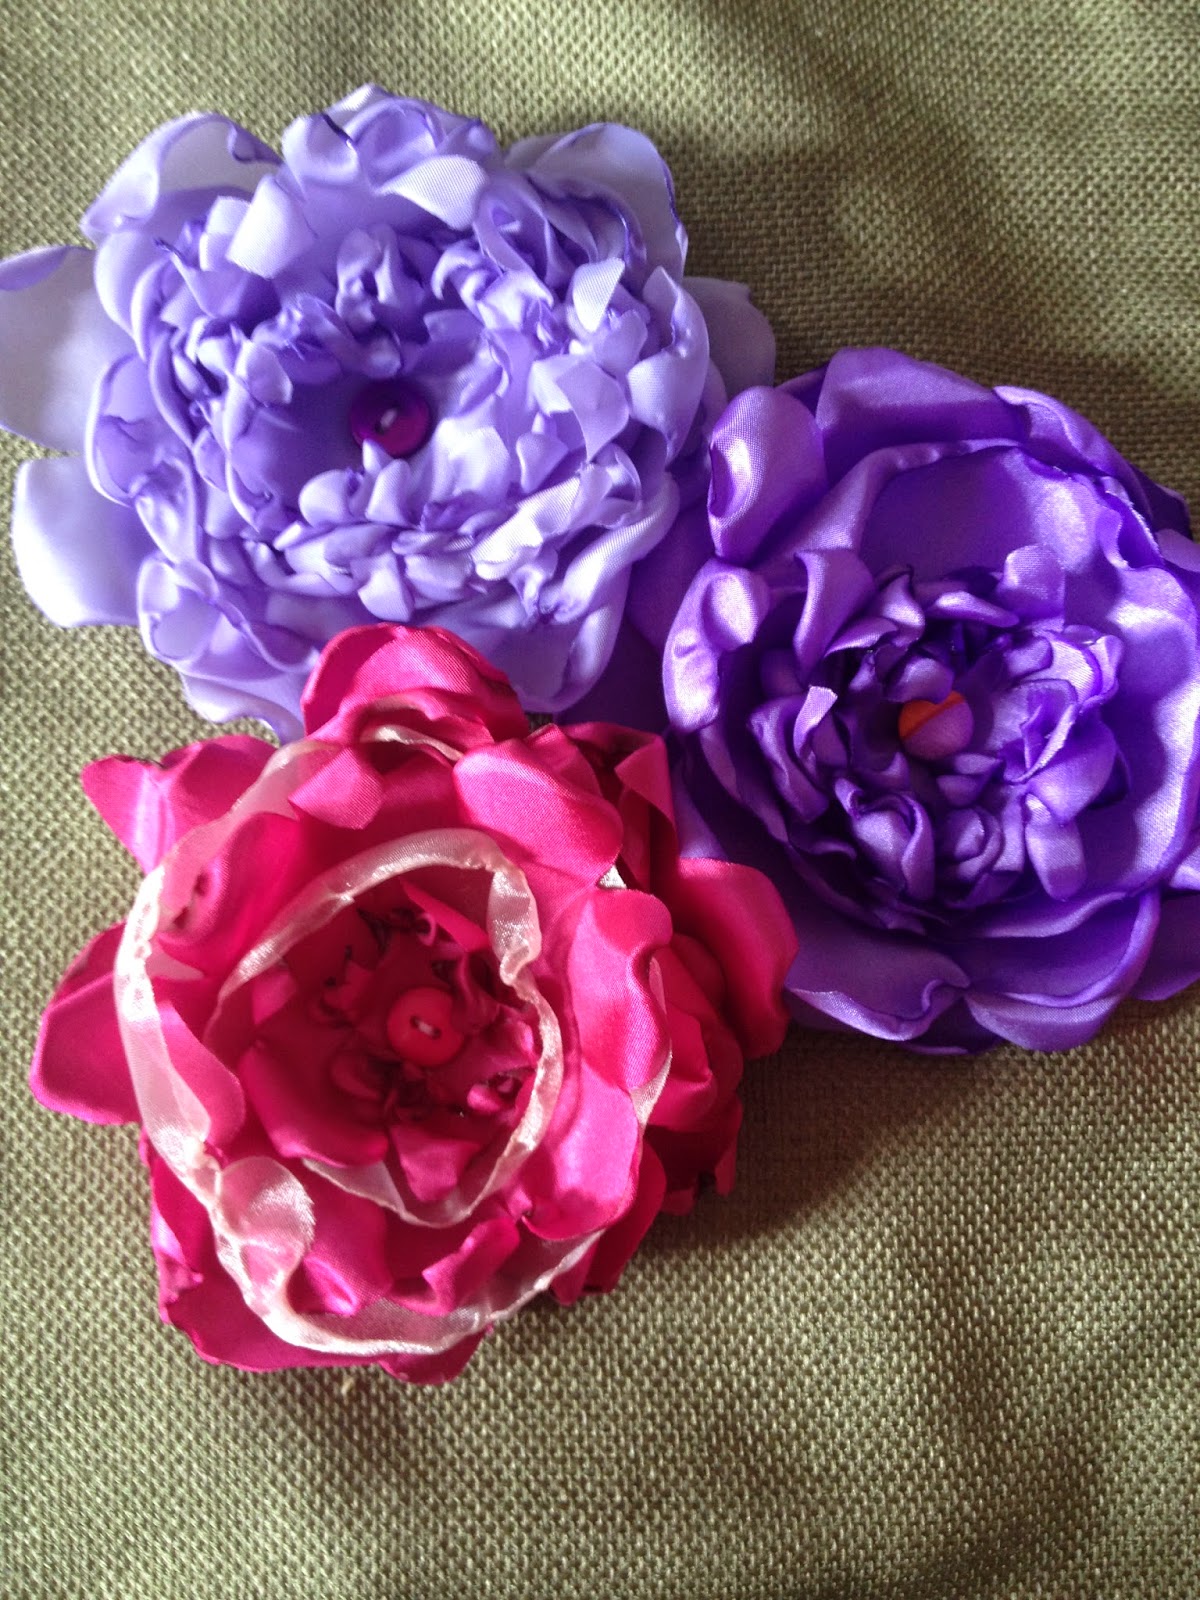
For Easter weekend i spent some time with my sister's family. My neice loves to do crafts with her Auntie Diane. Together we made this tray full of faux silk flowers. I got the idea from my friend K, who made similar flowers for our altered book swap last year.
To start I purchased 4" wide fabric from Joann's. the only criteria is that it MUST be synthetic. I chose cheap polyester lining and some satiny shiny fabrics, and some sheers and tulle-like selections in an assortment of spring colours. I chose several varieties of each colour to blend for the flowers. I think altogether this cost me about $20.
The fabric was cut into circles - about 4", 3" and 2" in diameter. Some were further cut into petal shapes. They don't need to be perfect - i just folded the fabric in quarters and eye-balled it.
To create the curled petals - you need a candle. the little jar type were the safest ones we could find. It goes without saying you need to be CAREFUL! We each had a metal cookie sheet upon which to place our fabric petals after melting the edges. You DO NOT put the fabric directly in the flame. It starts to melt and curl when it gets close. If you drop one (as i did a few times) luckily for me the flame just went out, rather than burning the house down. We used little olive tongs to hold the fabric. You could use a clothes pin. You just melt the edges a bit, and then re-position your tongs, then melt the rest. do not touch the melted edge until it cools. (which is pretty quick)
Once you have an assortment of fabrics and colours you can stack them up and create flowers. We used a little button in the center - but you could use beads.
To start I purchased 4" wide fabric from Joann's. the only criteria is that it MUST be synthetic. I chose cheap polyester lining and some satiny shiny fabrics, and some sheers and tulle-like selections in an assortment of spring colours. I chose several varieties of each colour to blend for the flowers. I think altogether this cost me about $20.
The fabric was cut into circles - about 4", 3" and 2" in diameter. Some were further cut into petal shapes. They don't need to be perfect - i just folded the fabric in quarters and eye-balled it.
To create the curled petals - you need a candle. the little jar type were the safest ones we could find. It goes without saying you need to be CAREFUL! We each had a metal cookie sheet upon which to place our fabric petals after melting the edges. You DO NOT put the fabric directly in the flame. It starts to melt and curl when it gets close. If you drop one (as i did a few times) luckily for me the flame just went out, rather than burning the house down. We used little olive tongs to hold the fabric. You could use a clothes pin. You just melt the edges a bit, and then re-position your tongs, then melt the rest. do not touch the melted edge until it cools. (which is pretty quick)
Once you have an assortment of fabrics and colours you can stack them up and create flowers. We used a little button in the center - but you could use beads.
Look how pretty they turned out!
You can use a few layers - like the pink one above, for a delicate rose effect.
Or use many layers - like the lavendar chrysanthemum style flower above.
Here you can see blending different colours and fabrics - solid and sheer.
You could hot glue wire or pipe cleaners on the back to add stems to place your flowers in a vase.
Or just use a safety pin to wear it to work!
Thanks Erica for a fun crafty afternoon!
Labels:
burn,
chrysthanemum,
circles,
crafts,
diy,
fabric,
faux flowers,
flame,
peonies,
polyester,
roses,
silk flowers
Sunday, April 6, 2014
Bar Cart Makeover
I am hosting a birthday brunch today and thought my bar cart could use a makeover. My good friends and neighbors gave it me me years ago when they did some remodeling. It has been a utilitarian place to put liquor but never got much attention until today!
This is the "before". Dark and messy with a lot of crap on the bottom shelf. Decor mags and blogs are filled with cute bar cart images, so I thought I deserve one too!First stop Cost Plus World Market for some purchases. I picked up some interesting sodas and waters in my colour scheme. My friend Karen gifted me the cute pink aluminum ice bucket. I recently acquired the vintage soda bottle in an awesome aqua blue. There is even a touch of pink on the handle. A collection of paper straws in pretty colours in a cylinder vase adds another vintage touch.
I moved all the booze to the lower shelf and added some fun party napkins in the blue green colour palette.
I covered the top tray and lower shelf with some green patterned napkins to add even more colour.
I am so pleased with how it turned out! Mint julep soda anyone?
Tuesday, March 25, 2014
Canvas and Dresses Play Date
My friend K invited us to her lovely home for a day of arts and crafts and yummy food. She had seen some images online of baby dresses on canvas and was anxious to try it out. She had prepared "samples" using various techniques so that she could advise us on the best recipe for success!
Here is a doll dress she dipped in plaster and mounted on canvas, which she then painted and added a vintage looking key. Not quite done - but you can see how cool this is! It looks like a priceless heirloom, when in fact it was a cheesy synthetic doll dress!
Here is a different variation - this time using Alene's fabric stiffener. the dress and hat look soft and fluffy - but are in fact hard as rocks.
For this cute overall, she tried liquid nails - a construction adhesive. it can change the colour of your item - but looks great with the texture of this fabric.
Here is Z's lace covered box. she is perking up all the ruffles after dipping it in fabric stiffener.
Z had this sweet little leather baby shoe and created the beautiful fabric and lace covered box for it to sit on. She was not quite done - still to add laces and other adornments.
S had two pieces to place on her collaged canvas - little overalls and a pink dress. She added some painterly touches and brought out the texture of the papers.
A play date at K's means a delicious lunch (breakfast and snacks too!). We had a two yummy salads and blt lobster burgers.
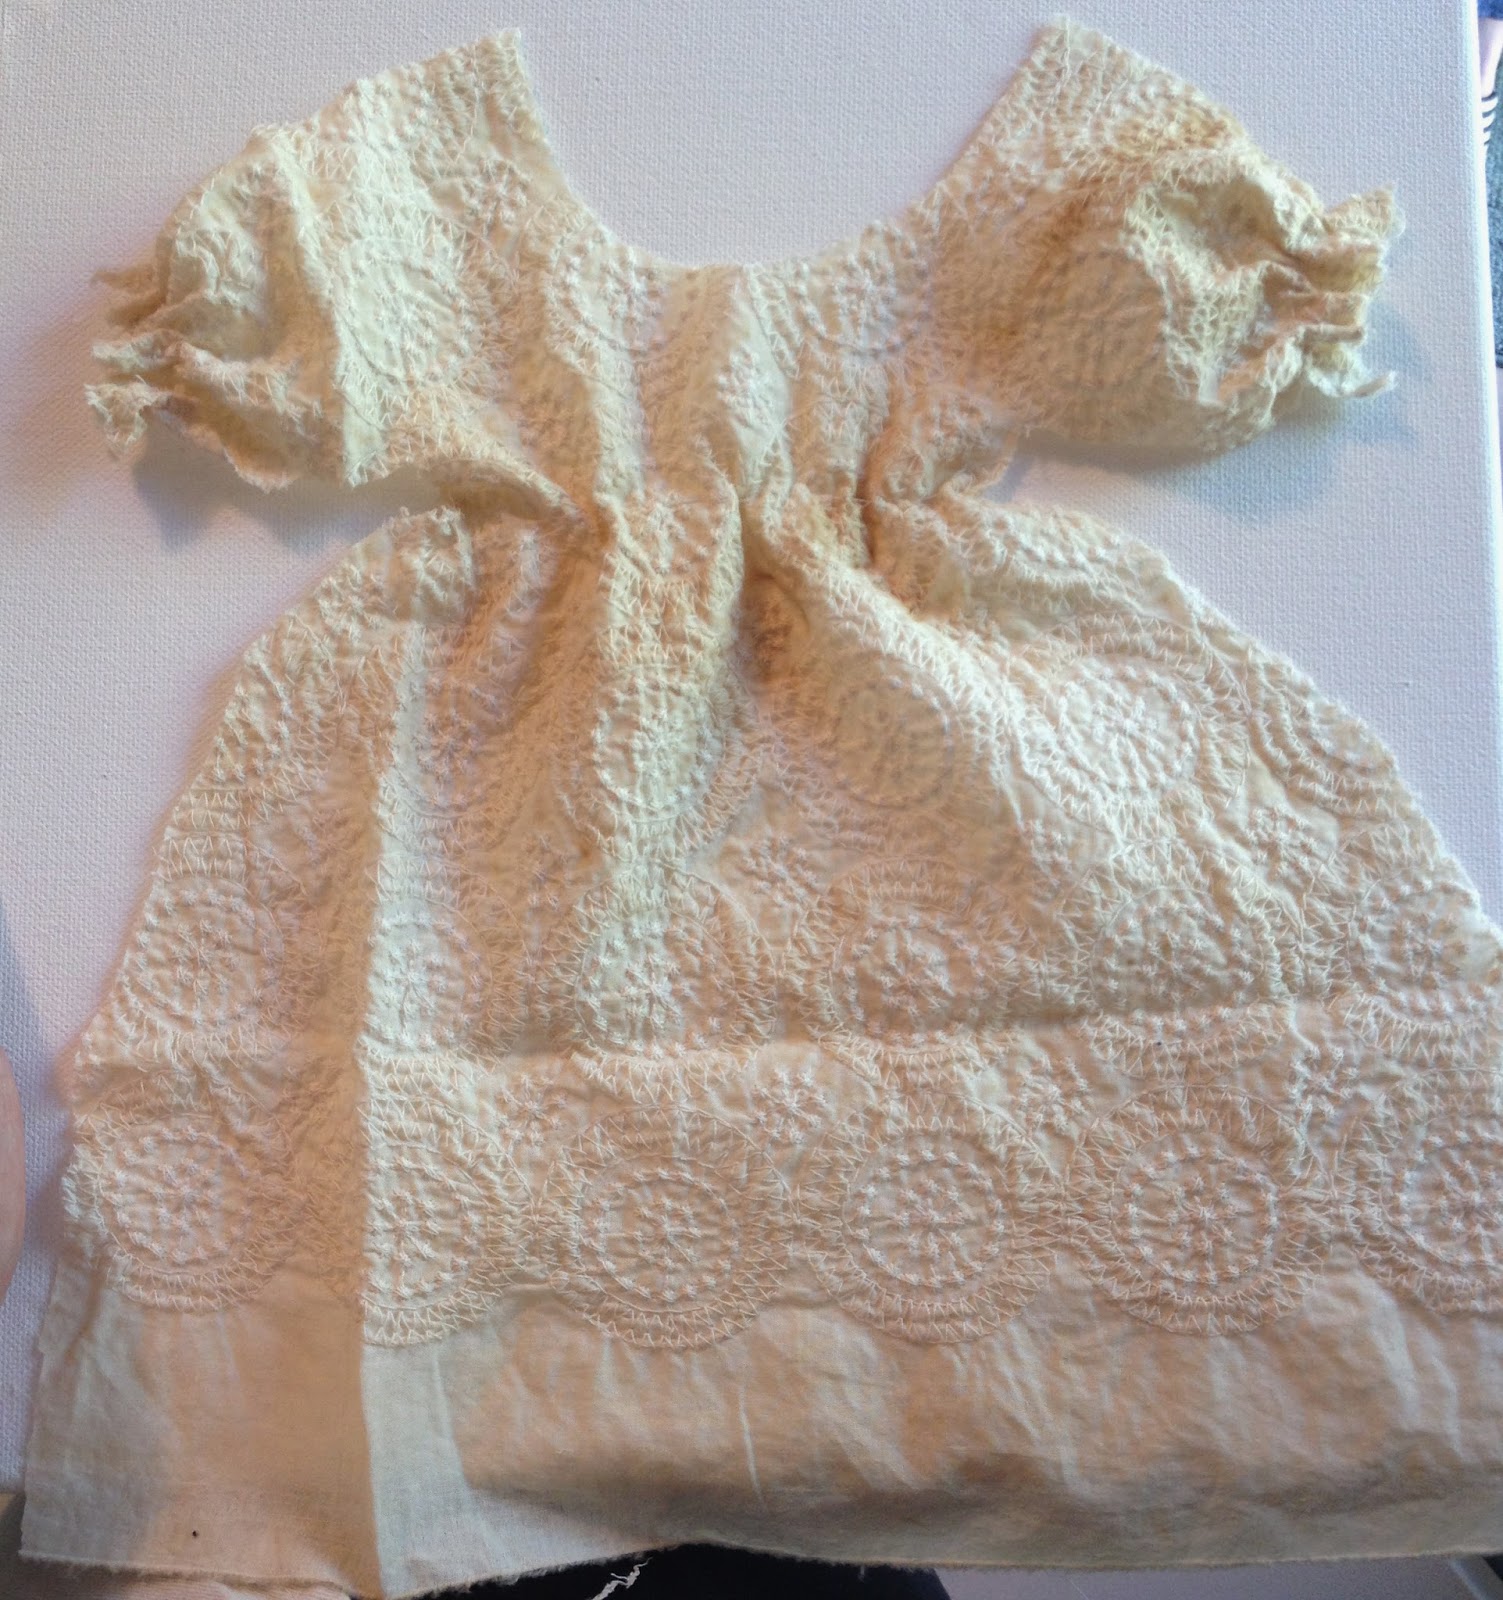
I did not bring a baby or doll dress for my project. I brought instead two scraps of fabric. The first one is a embroidered textured cotton with a few age marks. i got it in a swap a few years ago - you can see HERE. We thought it was very funny - "ooh look at my piece of old stained fabric - i got it in a swap!" Only us crazy artsy people think this is valuable!
For the background i used a pretty piece of Cavallini paper - with a couple of scrap cigar lables added.
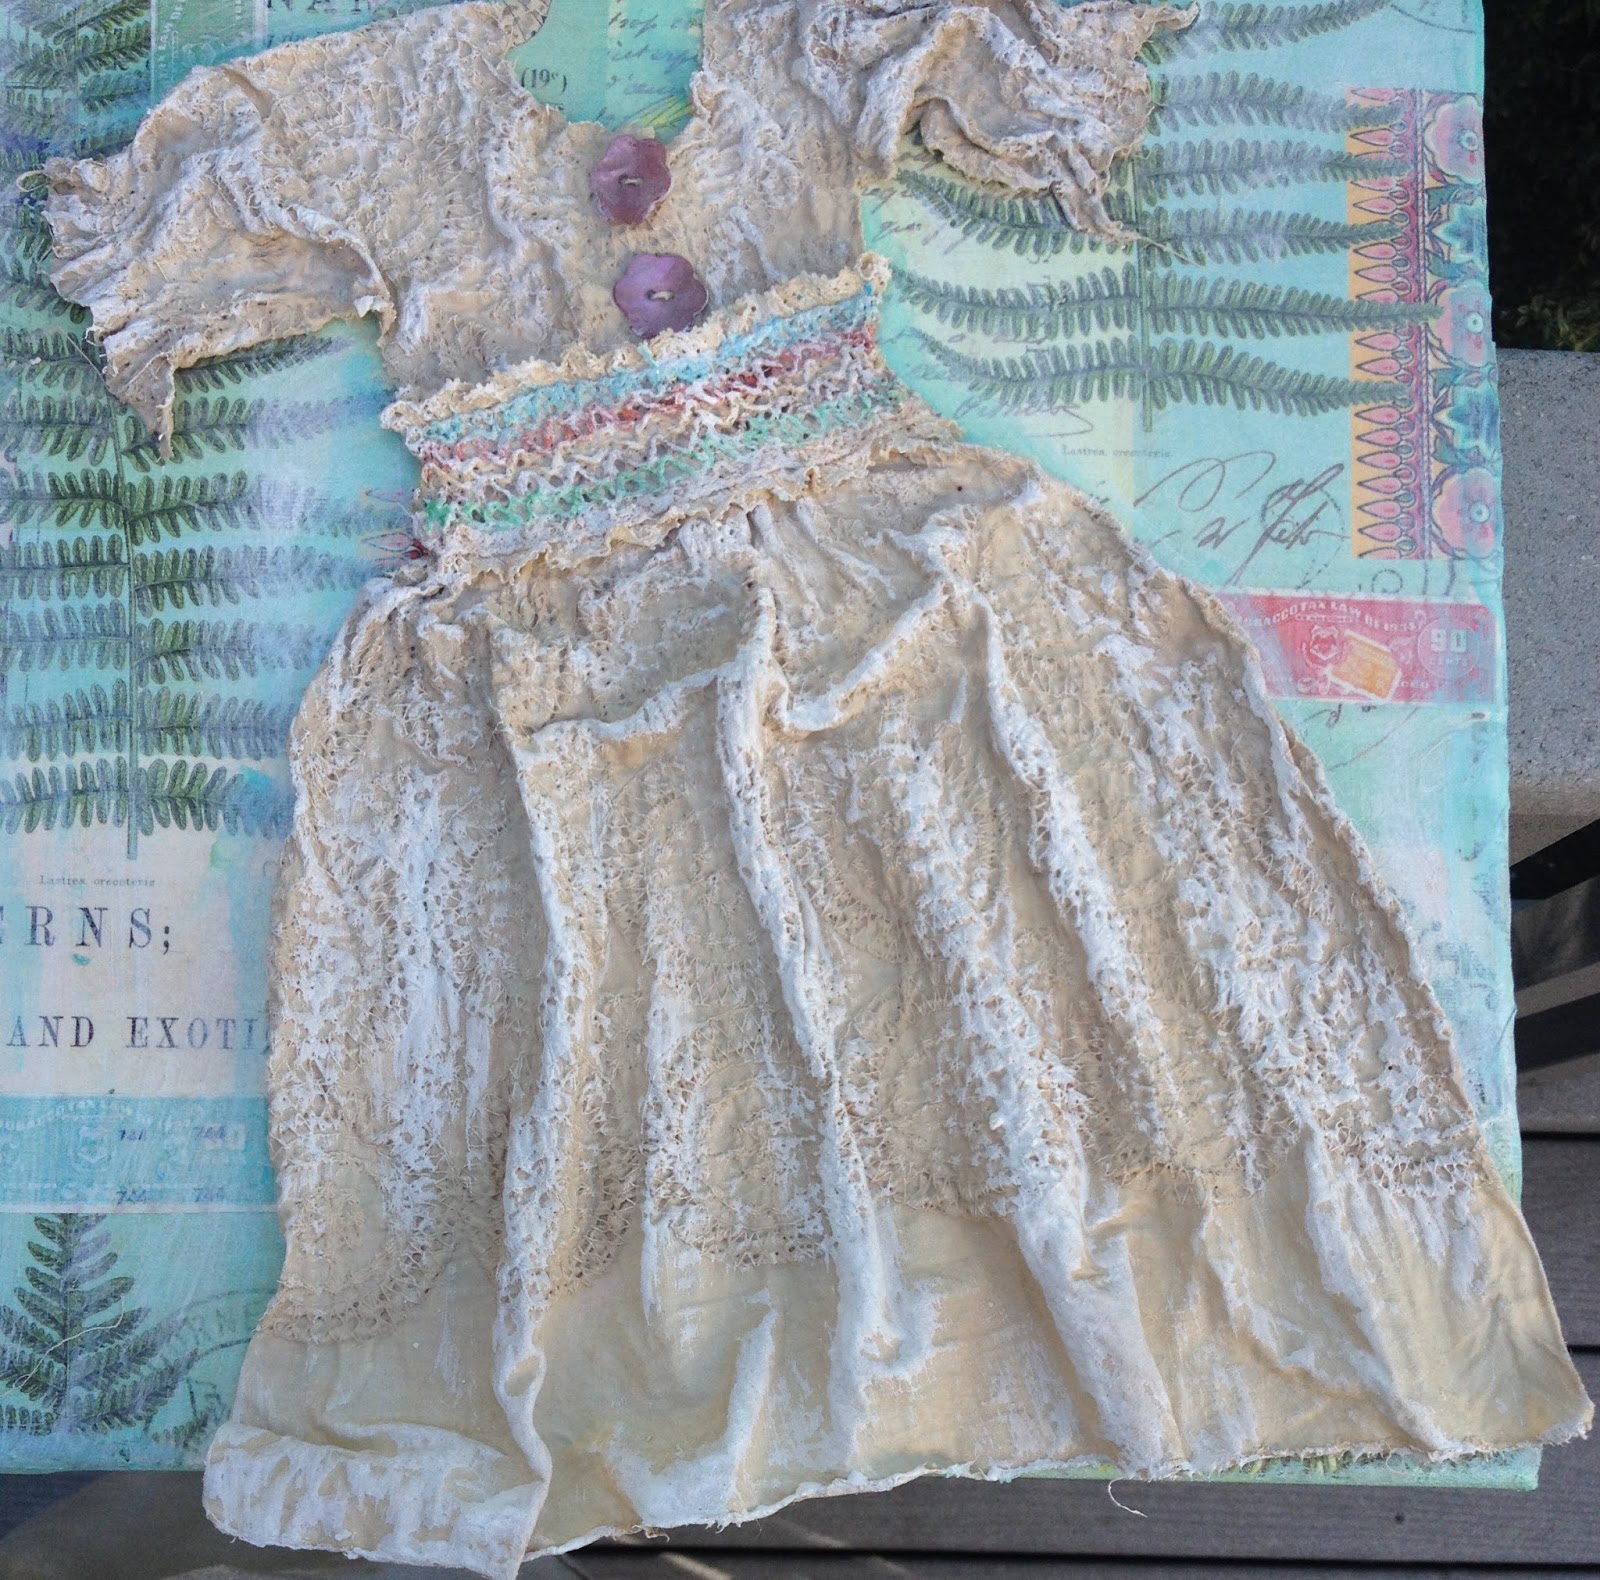
I put the dress into a ziplock bag K had prepared. It was filled with liquid nails. I smooshed it around and then pulled out the fabric and removed the excess. Then i laid it on the prepared canvas. It sticks! I used a skewer to arrange the folds of the skirt.
After about 2 hours it was dry enough to paint or embellish. I just added some white gesso brush strokes to highlight the fabric. Might add some more "stuff".
It took about 2 hours to dry and it turned green! It was also pretty transparent - like the texture of sea weed or deep fried spinach.
Here is a doll dress she dipped in plaster and mounted on canvas, which she then painted and added a vintage looking key. Not quite done - but you can see how cool this is! It looks like a priceless heirloom, when in fact it was a cheesy synthetic doll dress!
Here is a different variation - this time using Alene's fabric stiffener. the dress and hat look soft and fluffy - but are in fact hard as rocks.
For this cute overall, she tried liquid nails - a construction adhesive. it can change the colour of your item - but looks great with the texture of this fabric.
Here's a little dress in progress.
My friend D decided to make her dress out of textured paper. she created a colorful background and added some scrabble letters. She plans to further embellish her canvas with golf tees and possibly pez heads. But that's just D's signature style!Here is Z's lace covered box. she is perking up all the ruffles after dipping it in fabric stiffener.
Z had this sweet little leather baby shoe and created the beautiful fabric and lace covered box for it to sit on. She was not quite done - still to add laces and other adornments.
S had two pieces to place on her collaged canvas - little overalls and a pink dress. She added some painterly touches and brought out the texture of the papers.
A play date at K's means a delicious lunch (breakfast and snacks too!). We had a two yummy salads and blt lobster burgers.
For dessert we had a choice of key lime pie or individual lemon meringue tarts - how cute!
I did not bring a baby or doll dress for my project. I brought instead two scraps of fabric. The first one is a embroidered textured cotton with a few age marks. i got it in a swap a few years ago - you can see HERE. We thought it was very funny - "ooh look at my piece of old stained fabric - i got it in a swap!" Only us crazy artsy people think this is valuable!
I trimmed it into a dress shape and ran a few stitches along the sleeves.
Then i gathered the skirt.
A bit of smocking trim and a couple of buttons - and voila! We have a dress!For the background i used a pretty piece of Cavallini paper - with a couple of scrap cigar lables added.
I put the dress into a ziplock bag K had prepared. It was filled with liquid nails. I smooshed it around and then pulled out the fabric and removed the excess. Then i laid it on the prepared canvas. It sticks! I used a skewer to arrange the folds of the skirt.
After about 2 hours it was dry enough to paint or embellish. I just added some white gesso brush strokes to highlight the fabric. Might add some more "stuff".
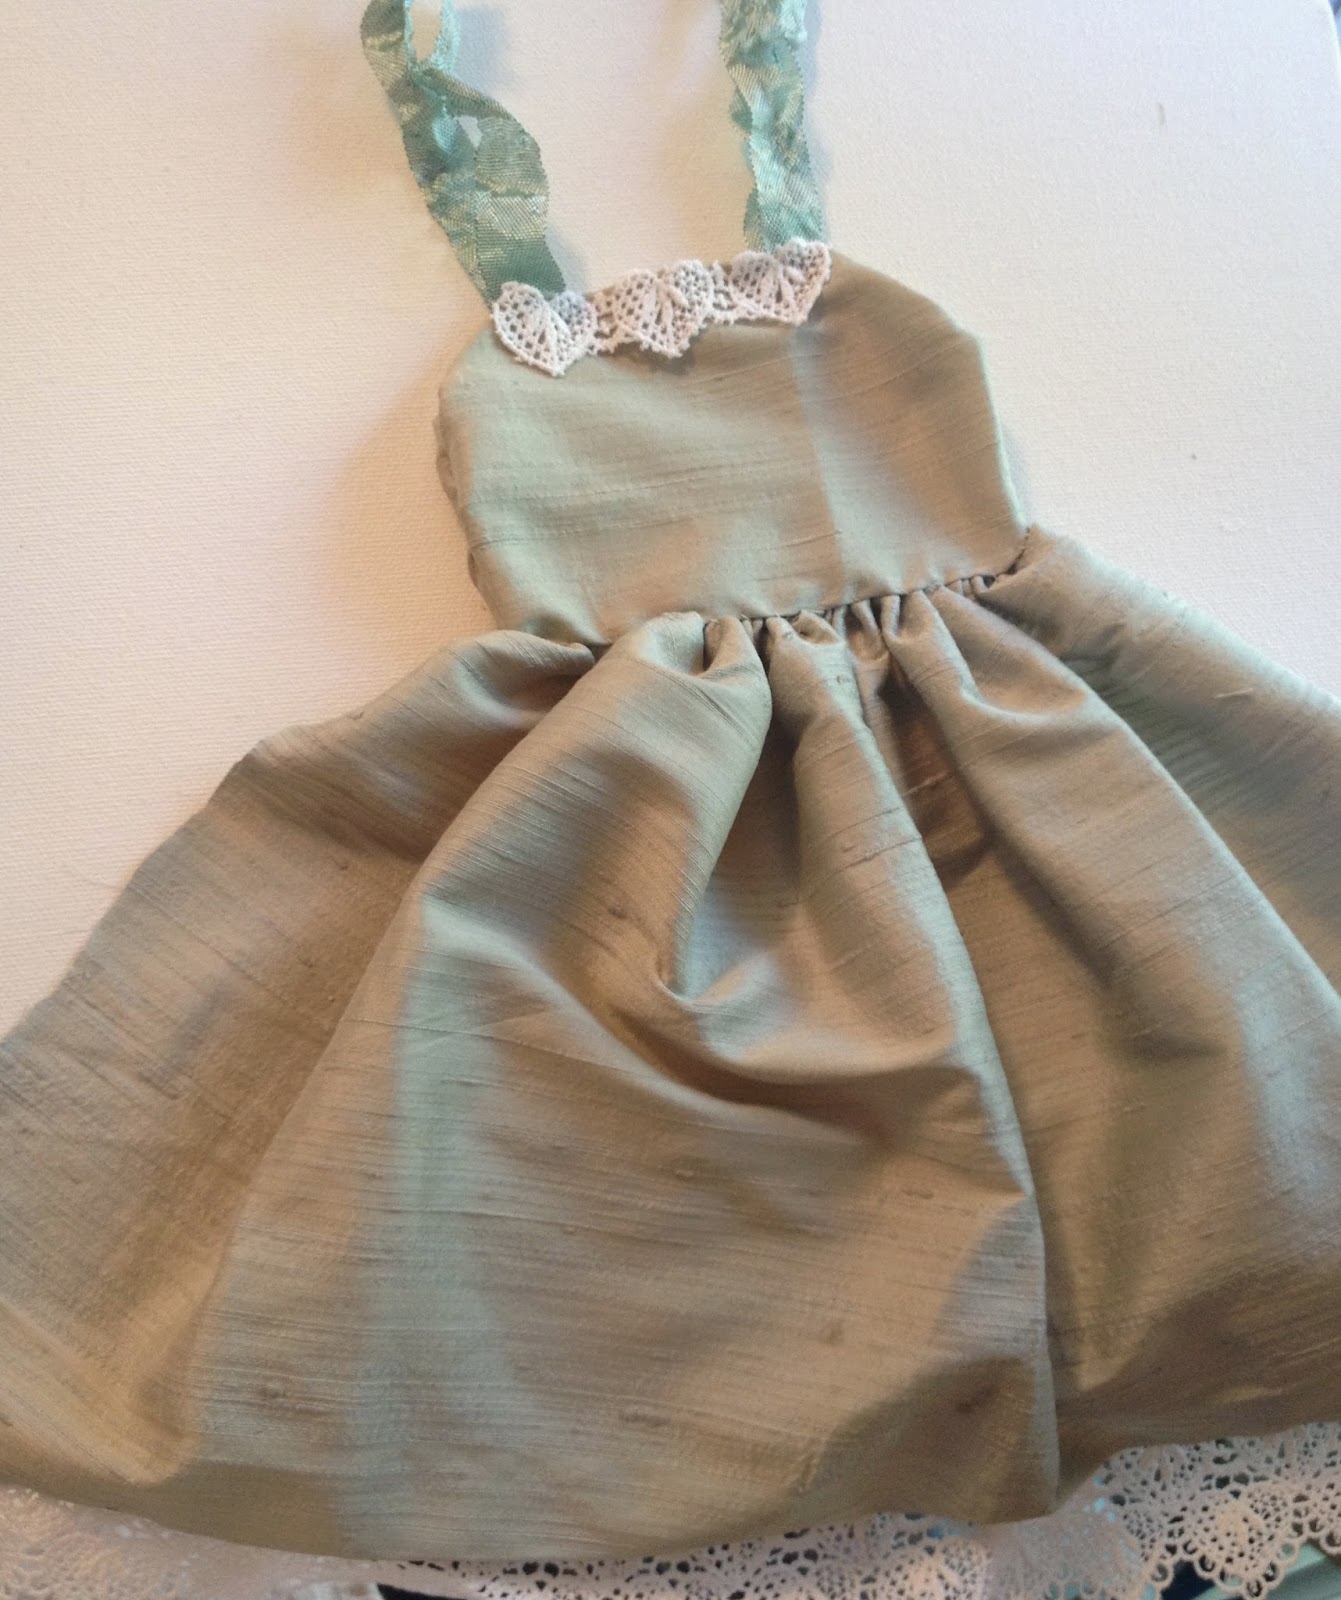
For my second dress i used a scrap of blue silk from a discarded cushion.
I cut out a rectangle and gathered it up for a skirt. Then i created a little bodice with lace trim. Some vintage seam binding ribbon for straps.
For the background i collaged wall paper scraps onto a 12 x 12 canvas. then added some text and sheet music. I left the center blank - thinking it would not show anyway..!
I placed the dress in a ziplock bag of fabric stiffener and laid it on the canvas.It took about 2 hours to dry and it turned green! It was also pretty transparent - like the texture of sea weed or deep fried spinach.
I added a bit of blue glaze to the dress which puddled in the texture of the fabric. I am not sure if i am "finished" - i might tone down the white lace with tea stain and add more embellishment to the canvas.
But all in all a really fun play date with my art peeps!
Altered Book Purple!
This month i worked in K's altered book entitled The Order of the Purple Rose - the third book i have done this year as part of our 2014 altered book round robin swap. Our books this year have no theme - except colour. See the other books HERE.
How cool is the eye that K made on her cover!
For my first spread i chose to celebrate wisteria. I used a background picture of a park and overlaid it with a stunning wisteria tree. It is raised up on glue dots so it really POPS off the page. I cut it out using mini stamp edge scissors to get a petal sized edge! the wisteria word is grey foam sticker letters, coloured with felt markers. a scallopped border has a few stones - 'cus our friend K likes her bling!
Next i was stumped for ideas - so i googled "purple" - just to see what came up. Well purple haze is apparently a type of plant with certain medicinal properties....so um...well... i think this spread speaks for itself! I used some of the techniques i learned in a Zentangle workshop i took with a friend last year. I doodled in dark green sharpie and then added purple and violet pens. A few more gemstones add some sparkle.
Labels:
altered book,
collage,
color,
doodles,
garden,
paper,
purple,
round robin,
swap,
wisteria,
zentangles
Subscribe to:
Posts (Atom)