Showing posts with label journals. Show all posts

Sunday, September 6, 2009

Going to the Chapel...


And well, we did go to the chapel, and we did get married - some 21 years ago. About 8 months ago i started a new altered book project with the California Art Girls. Marie had the idea to create wedding journals, in which each of the participants would create artwork, representing their own wedding. I wrote about my book here. Here was the last spead i did in Terri's book. That was back in March before i moved to the LA area. Then as these things sometimes go - i did not get a book for a long time - and then like city buses - three came along all at once! So i was determined to make good use of the long weekend to get these books done and mailed off to the next artist.
Here is the first book i worked on - a large photo album with watercolour pages. So if ever you are wondering what to do with the sleeves of your wedding dress - how about wrapping a journal with them? That's what Marie did here!
I decided it would be easier to work on paper out side the book and glue them in later. Since my wedding colours were peachy pink and lavender, i decided to use plain lavender computer paper as a base. But way to boring. So i used a stencil and Color Mists to create a subtle pattern. Since the stencil invariably gets all wet with paint -i used it like a "stamp" to create the reverse pattern on the other paper. Next i added a border of floral wrapping paper to the outer edges.
I wanted to try a scrapbook style i saw online i am calling "all bunched up". Essentially you create a cluster of things in the middle of the page with a lot of space around it.

The pictures don't show all the layers - but there is lace, the angel is on vellum, and a skeleton leaf adds an ethereal quality.

Some squished up rayon seam binding ribbon adds a nice vintage touch.

Here is the sign in page - Marie provided bell shaped water colour paper tags for us to alter. You can see how fun it is -so much variety!
The next journal was a traditional wedding book - albeit altered in a painterly way that hallmark probably never thought of! Roberta included her sister and parents wedding photos - so i thought i would include mine.
That's their wedding in 1952, and mine in 1988. Not many bells and whistles on this spread - but i did spend a lot of time on the background - pale pink mulberry paper with peach and lilac ink and a final dry brushing of white to tone it all down. The images are sanded in a cross hatch manner to tone down the ink. My parents photo is clearly vintage - but it helps tie to two together. I used organza ribbon as photo corners - very subtle - but pretty. A few stickers of pink roses and lavender bunches are a nod to my actual wedding flowers.
The last journal was a cute compact little book, strangely enough about rottweilers, but carefully concealed with wedding finery by Nancy. It had a more contemporary feel than the others - so i wanted to do a spread that was fresh and youthful.
I started with a background of two floral tissue papers. I laid out my images - featuring my bevy of bridesmaid beauties. (they looked so good someone suggested they came from a mail order bridesmaid catalog!) Then i just filled in around the images with pink roses and lavender flower stickers. I let some of the text - a romantic phrase - from the tissue paper remain. The final touch was a border of peachy pink organza woven through holes punched into the page.

I think there is one more journal to come. Then my own book should be on its way back home - with a beautiful array of bridal bliss...!

Saturday, February 14, 2009

Wedding Journal Round Robin


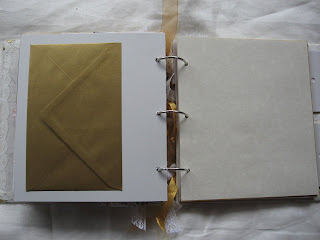
My wedding journal is ready to mail around to the first of 6 ladies who are participating in this project. The title of our books is "my wedding day" so you start off with a book featuring your own wedding day, and then it will have pages by each artist about THEIR wedding day. I decided to use an old small photo album for my book. I covered it with old lace paper doily placemats i picked up at an estate sale. i replaced the posts with large key rings and added an assortment of ribbons and lace in the colours white, cream and gold. I cut out all the paper for the book, 8 1/2 by 7 1/2 out of assorted white, cream and metallic papers. Not that my wedding was so elegant. But since i was not into paper arts back then, it was fun to "re-imagine" my wedding day, by changing the images to sepia tones. But since my actual colours with peachy pink and lilac - well - there had to be some pages done in those tones. Here is my actual invitation. I find it so dated - but it isn't that bad. I added gold wings to my beautiful bridesmaids. I wonder if they would have worn wings if i had actually asked them to, hmm? FYI - in the photo their feet were hidden in deep grass - so i just cut out long pointy shoes. They actually wore ladylike white sandals.But here are some pages i did on a whim - they have nothing to do with my wedding. I made this card in a workshop years ago and have been saving it for something, so why not add it to this journal. If i got married today, it would certainly be all about the perfect robin's egg blue and abundant bird and nest related elements. Wouldn't that be lovely?
You can see that i used many different papers, including some wallpaper, vellum, metallics and hand made paper with flower petals. I also scattered gold and vellum envelopes throughout - a little place to hide a photo or two. Or a scrap of actual peachy pink bridesmaid lace dress fabric!

Happy Valentine's Day, Sweetie

I am working on a collaborative journal called "my wedding day" with the california art girls yahoo group. I put this together for my journal, so i thought i would share it here on the blog, seeing as how it is valentines day and everything.
FYI - that is not my ring or my Birks box, but i found it on google images it looks pretty much the same. Oh, btw, Birks is like the Canadian version of Tiffany. I know i have MY silver box somewhere. The ring is on my finger, hasn't left in about 20 years....

Some of the pages in the journal coming soon. I also received the wedding journal from Terrie that i get to work on for the next few weeks. I'll post some of that too!

Tuesday, February 10, 2009

Art journals for kids

I did my very first volunteer job today, hosting an after school art program at a local school. It was a frenzied hour and a half and my praise goes out to teachers who do this 8 hours a day! I had three or 4 groups of kids, from 1st grade to 8th, 6 at a time. We made simple journals, like the ones above that i made in Lisa Sonora Beam's workshop i spoke about here. The kids were coming and going, getting picked up throughout the session - so it was a bit rushed.
The school had a large stack of heavy handmade paper in assorted colours. The first group (thankfully the oldest students) helped tear the paper into half and half again to make the covers for the books. Each kid selected the colour they wanted for their cover. Then chose from a rainbow of colour printer paper for the pages inside.Each page was folded in half,to then stack for the signature, and tied into the cover with yarn. For some added glitz there were beads to tie onto the yarn. One little boy wanted something other than the flower paper i brought to accent the books, and he was right, that i needed something masculine. so i cut out a sail boat, complete with waves for his book. The other kids were happy with sticker labels, plus they could work on them more at home.
I suggested they tear pictures from magazines of things they like and start a "glue book". Or they could use it as a journal. But one girl thought that would not work without a lock, since her brother would surely read it. I suppose she was right!


Wednesday, December 10, 2008

The Creative Entrepreneur Workshop

I had the pleasure of attending a workshop with 9 fascinating women in San Anselmo last weekend. It was taught, or perhaps facilitated is a better word, by Lisa Sonora Beam, the creative force behind the new book, A Creative Entrepreneur. FYI - the book is full size, over 100 pages. This was a pamphlett we used in the class.
I would have shared this sooner, except that in my haste to rush to two parties Saturday night, i left behind my supplies case, including my digital camera. Hubby picked it up for me this afternoon so I can proud to share what i made.
We started by dumping a bag of assorted papers each of us had brought to the class on the large table. As Lisa said, we did not bring junk - we all brought really cool papers. The first project was to gather up whatever caught our eye. It was interesting to see how palettes would develop. Mine was very neutral - with touches of orange and gold. Once a dozen or so papers were selected and arranged, and tied with ribbon or yarn, we created the first of many journals. The lesson was to just "DO IT". Not to over-think it. Just dive in and get started, and before you know it, you have something completed. This was one of many simple messages throughout the day.
Next we did introductions and talked about each person's goals and interests. Overall the theme was to "get back to art" or to find oneself through art. Be more spontaneous, and in my case - see if there is money to be made!
Here we took a striped file folder, tore it into 4 pieces and each made two mini journals. One i made into a girlie girl book with lots of pink and purple, adding some rub-ons and stickers. The other became more masculine with greens and browns and some ledger paper.
The next mini journal idea was to create some very simple books with solid color card stock, and brightly hued paper. We used 8 1/2" by 11" paper - just torn in half. These can be made fast and easy, and given as gifts. We used a long reach stapler to bind these, with some ribbon for an added touch.
The next idea that Lisa shared was to make journals with cards you have collected. These can be christmas or birthday cards, or the cards you buy that you have NO INTENTION of ever giving away! (i have hundreds of these!!) Lisa showed us several examples - where she used the blank side of the paper to add journaling - thoughts about the sender, what she was thinking about that person, etc. Here i made one with some cards i made on nice italian card stock, with a image from a sheet of vintage French postcards. I used 4 cards, some flipped backwards, interleaved with some light handmade paper and tissue. The bird needs to be cut out and attached to the cover.
These long and narrow journals were made primarily from scrapbook paper i brought from home. Do you have nice paper you don't know what to do with, but you just Love It? Take the 12x12 sheets and fold them in half lengthwise. Glue them back to back, and staple together.
For this one i used a transparancy sheet with bird cages - it makes a great cover. Looks "store bought" if you know what i mean. The twin birds on the inside are one of those pages from inside the Somerset Studio magazine.
Here is one more long and tall journal, with a vintage mid century modern feel. Just wanted to use this cool paper, that never seems to be the right thing for an altered book project - so it works best just standing on its own.
I heard about this workshop from the Decor8 blog. She often shares the work of artists who have turned their talents into a business. Check it out.
The mini journal workshop will be offered again in January, along with some other more in depth classes - please check them out at Lisa's website.
Thanks Lisa for a great class, and it was nice meeting all the ladies who participated, and reconnecting with some friends and former students. I just touched on the lessons from the class, but Lisa had many meaningful ideas and tips for an artist who wants more. I would highly recommend taking a class with her.