Wednesday, November 28, 2012

Under the Sea Altered Book

 As these altered calendars go around the second time - it is harder to come up with an original idea!  ALl the cool fish had been taken already....
So i came up with the idea od an undersea look at polar bears!  I printed some images on paper and some on transparencies to give the pages an icy glow.

 I cut the two inside pages of the spread to resemble icy frongs and added white pain, blue green ink, and some fish stickers.
 There is a polar bear swimming in the icy blue transparency.
I was sure to add some specks of "ice" with micro beads and stickles.  Bbrrr...!

Halloween Altoid Tins

 Last month we had a play date to alter altoid tins using halloween as inspiration.  This is one of mine - with a vintage image of a boy and girl - but added a pointy hat and some butterfly wings.  I got little glass bottles for everyone to add potions to their tins.
 Here is another one of mine - with a plastic glow in the dark skeleton and a white rat with an orange feather tail.
 Here is D's box filled with creepy things and black netting to hold it all in.
 Here is S's box - she used a larger tin with a window - there are two sets of eyes inside.
 Here is the back of Z's with a vintage witchy image.
Here is the front of Z's- - with a shiny moon and a creature terifying a young girl.
 Here is the tin from K showing more of those cool glass bottles filled with beads.
Here is a book cover K made to enlose her tin.

L made two tins even thought she could not spend the day with us.  I have images in an email i cannot seem to attach to this blog!  Sorry L.!

Monday, October 1, 2012

Paper Doll Collage

 I had a fun play date with my buddies Z and K last weekend.  We created artwork inspired by the book Collage Couture by Julie Nutting. Buy it now on Amazon!  She gives you all the techniques and inspiration you'll need to create your own lavishly dressed paper dolls!
 Here is Z's "belle femme".  The title was chosen from the bit of text paper used for the neck and shoulders where it says beautiful woman.  She chose a background paper that is printed with  a stencil effect.  The flower is made with sewing pattern tissue paper.  The petticoat is an old map and an assortment of pretty pink patterned papers make up the dress and skirt.  The hair is hand painted and has streaks of gold!  A bit of pom pom trim completes the artwork.
 Here is K's piece on a mini clipboard.  She went with a bold purple colour palette.  Her petticoat is ruffled sewing pattern tissue paper and was also used as background for the two stamps - the chandelier and the flourish border.  She started with a collage background but used gesso to tone it down to make the paper doll pop.  Originally Grace had same killer high heel shoes, but her name in chip board letters covers them up!
And finally here is mine, titled "Pretty".  A little too busy i think.  I started with a polka dot background paper and added additional scraps and ephemera on the left side.  I need to either gesso the background or add some outlines to my paper doll, so you can see her better on the clipboard (full size this time).  I used 5 different green printed papers for her skirt and bodice.  A sharpie does a nice job making shiny ankle strap shoes.  I flipped through a vintage children's Reader looking for an appropriate poem and found one titled The Tea Party.  Perfect for my pretty lady!

Monday, September 17, 2012

Altered Calendar - September 1963


 For the latest monthly round of the altered calendar round robin, I once again had the book 1963 to work in.  Please see my previous pages HERE.

When you google September 1963 to find stories or ideas, sadly you learn about the horrible bombing of the church in Alabama where 4 your girls died.  I debated creating a spread about that for a few minutes, but decided I was not well suited for such a serious topic in my art.  Instead I went with the two other most common google search responses – vintage magazines and the new fall TV shows.

My first spread is a nod to K’s car crazed husband with the cover of the Sept 1963 Motor Trend.   yes –it says 1964 cars on the cover – because September is when the new cars come out!
 Inside I showed a spoof car ad from MAD magazine from the same year.  It talks about how useless you feel when they do come out with the NEW cars, hence a marketing ploy to see you a 1963 and ¾’s car – in this ad – a re-issue of the Edsel. Yuk yuk.  Both pages are covered with wide packing tape to look glossy like a magazine.
  The next spread features a 1960’s era family room, probably somewhere in sunny southern California.  I wanted to do something ambitious where the TV screen  would be a window onto the next page – but had to scotch it.  So it is just a cool mid-century modern family room!  I chose the collegiate letters and the autumn leaves, two things that signify back to school and the big issue of TV guide!


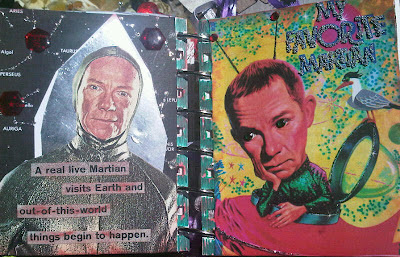
Next spread has one of the new TV shows for 1963 – My Favorite Martian.  I found two images of Ray Walston (Mr. Hand to you 80’s loving movie go-ers) and glittered them up with jewels, stickles and metallic flecks.  The space ship on the left is metal duct tape.  it was just a bonus that there is a cute bird on the right!
Another new program launched in September 1963 was The Judy Garland Show.  In the early days of my altered book journey, it was hard to find images for a specific spread.  Nowadays you can find just about anything in Google images.  But interestingly, there were very few images from the show that were bigger than mere thumbnails.  You can specify “large” images in your search, so that they will print out crisp and clear and you can size them however you like to fit your collage.  Not to get into copyright laws or anything (a lengthy topic in the collage world) but in my opinion if I am using images for my own use, i.e. not to resell, there is nothing wrong with it.  I will never post images of another person’s artwork here without giving them credit.  Or better yet – add a link to their website.


Ok speech over!  So I found a telegram that Judy sent Sid Luft in 1963.  (it wasn’t in September – but I hid that on the page!)  Still relevant, don’t you think?  The image on the left was actually from the Andy William show, with Andy cut out!  The image on the right in the stunning sequin/zebra gown was the only one I could find of any quality.  I used a background of some black textured paper to echo the stripes and added some white and black glittery strips.  The green seaweed with “cool” on it was so perfect – it was just a  scrap on my work space left over from a prior book, “under the sea!”!


Monday, September 10, 2012

Altered Blocks Play Date

Sunday afternoon and another creative adventure with my gal-pals.  We created "block heads" - or wooden blocks altered with faces.  Our inspiration was the work of Andrea Matus deMeng, wife of Michael deMeng.  Our friend D, is a huge fan of his and has several of his works.  She recently purchased two of Andrea's pieces and it was based on her art (along these lines) that we planned our play date:
Art work by Andrea Matus deMeng
Essentially it is a thick block of wood, about 3" by 5" mounted inside a shadow box.  The effect is quite magical but easily interpreted by amateurs!  You need a face and some paint or paper to create a background.  Then you add "doo dads" to create a headdress, collar, wings, breast plate - whatever you can think of!  While her pieces are quite dramatic and intense looking, we managed to interpret the concept in our own style!


D. happened to have a supply of old children's blocks for us to use.  One was 3" square and the other about 3 by 1.4".  We used to these to build our block heads.  A quick sanding and a coat of gesso for me.
I started by adding collage papers to the square block: sheet music, Florentine scroll, napkins.  My intention was to do a different face on the second block.  But as you can see above - it became the "body" for my face.  the face was cut from a vintage photo printed on matte photo paper - excluding her hair.  Next i added feathers from a butterfly for a headress and added a metal crown charm.  Next two gold birds were added above her eyes to help frame her face.
I covered the smaller block in paper and glued it below her neck. A large gold butterfly creates wings, or perhaps a cape?  An aqua marble stone is a brooch holding it on. A sort of skirt was created with a large gold filigree earring with dangling aqua feathers. On top i added a fimo clay element that had been stamped with the word ART before baking.
The whole thing will be mounted on a sturdy card stock and inserted into a shadow box frame, or possibly a elongated cigar box.
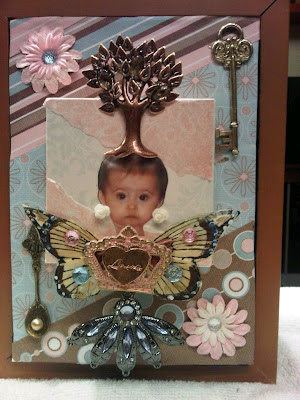
Here is K's pretty little angel, her granddaughter.  Her face was glued onto a paper covered block and delightfully embellished with a copper tree of life on top of her head.  A butterfly and crown, and cute little rose earrings were added.  Then she was mounted the block into a collaged background, further adorned with flowers, a key and a little spoon.  And some bling!  Young or old, a gal has to have her bling!  It will all be placed inside a wooden shadow box.
Here is D's whimsical block - as you can see used the block on the diagonal. First it was brightly painted and stencilled. Her face was from a magazine and an umbrella became her skirt.  A colourful butterfly centers the piece.  A brightly jeweled earring because the headdress and the block is glued to a vintage ruler - which conveniently has a hole at the top to hang it, and another at the bottom to add a metal earring.  A paper cut out Saturn was glued to the disc as the final touch!
Here is Z's work in progress - King Crow!  Yes - on her painted black block, that's Elvis's face beneath a pair of painted nail scissors acting as eyes and the beak of the crow.  His glossy black hair has been enhanced with some iridescent black feathers with a greenish shimmer.  Going with a Halloween theme, Z used a shadow box as a base.  She added different orange papers, including a paint chip to fill the sections.  The word C-R-O-W is spelled out with assorted letters.  Some sticker tape bats line the edges.  Z plans to add some birds nests made out of wire with eggs to the bottom section.  Isn't this cool?!