Showing posts with label feathers. Show all posts

Tuesday, November 11, 2014

Altered Bird

I finally finished my little altered bird project from our play date a  few weeks ago.  i am happy to share him here on the blogsphere.

I started with a little resin bird i picked up at Anthropologie a few years back on clearance.  They had similar birds all done up steam punk style for like $250!!  I thought  - well i could do that myself.  I certainly have plenty to doodads and glue.
Birds by Jim Mullanium
Here was the inspiration birds like the ones i saw  at Anthropologie - they are by this company Mullaniumbyjimandtori.  They only sell wholesale - no prices on the website. You can also google steampunk birds to see many more like this!
Bird by Julie Haymaker
My friend S took a class at Art Unraveled with Julie Haymaker Thompson called Birds on Wheels and made one similar this last summer with a key on the back. They started with a kit that included an unpainted bird.
 My friend K picked up some unpainted wood wheels at Michaels and along with some dowels - we had our axel.  Then it was just a matter of choosing which metal cogs and gears to use to steampunk him up!  
Luckily the Michaels beading section had lots to choose from.  The little beanie cap was from a bracelet.  I used some heavy duty upholstery tacks to attach the wings and tail.
I used some metal ruler tapes i had purchased at Art is you to make "feathers".  But added some real peacock feathers for colour and texture.  At this point i spent some time thinking about what to do next.
First step - paint.  The red and cream body colour did not work great with the peacock colours.  I find painting birds super easy.  just keep adding feather-y strokes in assorted colours and you cannot go wrong.  A bit of lighter paint for the chest and face and there you have it.

Then the big question to bling or not to bling?  Most steam punk things are metallic, but not so glittery.  I guess I'll live with him a while and see what happens...!

Monday, September 10, 2012

Altered Blocks Play Date

Sunday afternoon and another creative adventure with my gal-pals.  We created "block heads" - or wooden blocks altered with faces.  Our inspiration was the work of Andrea Matus deMeng, wife of Michael deMeng.  Our friend D, is a huge fan of his and has several of his works.  She recently purchased two of Andrea's pieces and it was based on her art (along these lines) that we planned our play date:
Art work by Andrea Matus deMeng
Essentially it is a thick block of wood, about 3" by 5" mounted inside a shadow box.  The effect is quite magical but easily interpreted by amateurs!  You need a face and some paint or paper to create a background.  Then you add "doo dads" to create a headdress, collar, wings, breast plate - whatever you can think of!  While her pieces are quite dramatic and intense looking, we managed to interpret the concept in our own style!


D. happened to have a supply of old children's blocks for us to use.  One was 3" square and the other about 3 by 1.4".  We used to these to build our block heads.  A quick sanding and a coat of gesso for me.
I started by adding collage papers to the square block: sheet music, Florentine scroll, napkins.  My intention was to do a different face on the second block.  But as you can see above - it became the "body" for my face.  the face was cut from a vintage photo printed on matte photo paper - excluding her hair.  Next i added feathers from a butterfly for a headress and added a metal crown charm.  Next two gold birds were added above her eyes to help frame her face.
I covered the smaller block in paper and glued it below her neck. A large gold butterfly creates wings, or perhaps a cape?  An aqua marble stone is a brooch holding it on. A sort of skirt was created with a large gold filigree earring with dangling aqua feathers. On top i added a fimo clay element that had been stamped with the word ART before baking.
The whole thing will be mounted on a sturdy card stock and inserted into a shadow box frame, or possibly a elongated cigar box.
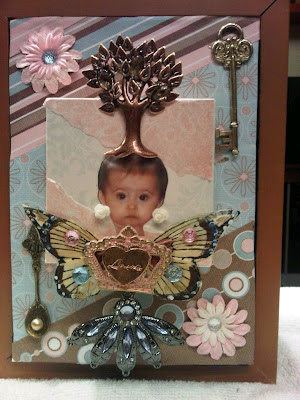
Here is K's pretty little angel, her granddaughter.  Her face was glued onto a paper covered block and delightfully embellished with a copper tree of life on top of her head.  A butterfly and crown, and cute little rose earrings were added.  Then she was mounted the block into a collaged background, further adorned with flowers, a key and a little spoon.  And some bling!  Young or old, a gal has to have her bling!  It will all be placed inside a wooden shadow box.
Here is D's whimsical block - as you can see used the block on the diagonal. First it was brightly painted and stencilled. Her face was from a magazine and an umbrella became her skirt.  A colourful butterfly centers the piece.  A brightly jeweled earring because the headdress and the block is glued to a vintage ruler - which conveniently has a hole at the top to hang it, and another at the bottom to add a metal earring.  A paper cut out Saturn was glued to the disc as the final touch!
Here is Z's work in progress - King Crow!  Yes - on her painted black block, that's Elvis's face beneath a pair of painted nail scissors acting as eyes and the beak of the crow.  His glossy black hair has been enhanced with some iridescent black feathers with a greenish shimmer.  Going with a Halloween theme, Z used a shadow box as a base.  She added different orange papers, including a paint chip to fill the sections.  The word C-R-O-W is spelled out with assorted letters.  Some sticker tape bats line the edges.  Z plans to add some birds nests made out of wire with eggs to the bottom section.  Isn't this cool?!