Showing posts with label stamping. Show all posts

Sunday, October 2, 2011

Curiosities Theme Matchbox Swap

I participated once again in Heather's Petite Inspiration Matchbox Swap.  The theme was "Curiosities". 
 You could choose to do black and white, halloween, or just vintage.  I chose to do a sort of halloween steampunk collection of goodies - and used Heather's graphic as my inspiration, even included a large faux vintage key!
 I covered my box with text and images from an old Sear's catalog (reproduced) with various potions and elixers.  I added some purple and black ribbon to the edge and applied purple lace with a black button to the end of the box. 
 Here is the array of doodads i wanted to put INSIDE the box! I pulled together an assortment of cool vintage, metal and halloween themed items.
 Here is a cool idea - stamping on muslin. The spectacles and  bicycle are stamps from Michaels dollar bins.
 I purchased several containers from TAP Plastics to house the little things like buttons and metal findings.  You can see them in the middle above, little plastic vials, the clear purple box, the flat box, a square box.  And no, you are not seeing double!  I always make sure each of the two boxes contain the SAME items!  Not required - but it makes it fun to set my own restrictions!  Or else i'd never know when to stop!!
 Here are some small vintage-y images i put in a glassine envelope with a cool eye sticker.
 Here are large items that would not fit in the box - but i added along for the ride.  The vintage illustrations attached to a sheet of orange trading stamps are rub ons from Michaels.   I put them all in the black paper goodie bag with the cat's eyes.  The orange "happy halloween" is one of those foam cut outs.
 Here are more of the papers, napkins and transparencies i included.
 Here is how everything looked when it was ready to get packed up. The purple coffin is some kind of putty from CVS - more "modern" than i like - but i liked the colour matched my theme. I just love that butterfly ribbon. You can see what fit into the box, including a porcelain doll arm and some ribbons and lace.

 Here are a few more shots of my completed box.  I created a black tulle ruffle along with some purple shimmery ribbon to create a "nest" for a black raven bird from Michaels.  I made a crown out of a gold wire star, by bending it into a crown shape - then added some additional bling with sticky rhinestones.
My final touch was another muslin printed with the word SECRETS tied with a bit of ribbon and loosely draped over the bird. 
Be sure to check out examples of the other participants swaps here on flickr.
Here is my swap last year.

Tuesday, April 19, 2011

Fun with Dominoes...!


Sunday afternoon i met with more creative friends for Fun with Dominoes.  How much fun can you have with dominoes, you might ask?  LOTS!  Here you can see all the dominoes the five of us created.  PLus some copper discs that K wanted to make weathered looking, by applying some adirondak ink.
Here are some of D's fun and funky styled smaller vintage cream dominoes.  She stamped with Staz-On ink and added colour and whimsy with Sharpie pens.
Here are some of my larger white dominoes, new from Target - about $4 for a tin of 28 dominoes.  I stamped with a script stamp in assorted colours of Staz-On ink.  Then i added birds cut from foreign postage stamps.  I added some text from an old book and copper tape around the edges.  A little rhinestone adds a touch of bling.
Here are some that B created.  She created collage using several stamps on multiple dominoes - how cool is that?  I love the combination of the teal and purple inks.  She found some images in my stash - that women in the white bathing suit is my mom!
Here are K's with an assortment of stamping of faces and eyes.  She used alcohol inks to create the marbled stone effect.
Here are L's dominoes.  The top row are from a bracelet kit - she will string them together with beads to create a stunning one of a kind jewelery to wear.  The metallic ones shown are actually bamboo faux dominoes - taken from a bamboo placemat.
Here are more of D's showing the options for applying alcohol inks and rubber stamping on top.
Here is an assortment that illustrates how many different looks you can achieve.  Stamping black on white, adding colour with Sharpies, edging in coloured tape.
Wow - it really is quite remarkable all the different styles we created that day.  So what to do with them all?  I'm sure you are asking yourselves!  Well - you can drill holes and create pendants.  Add a pin back and create a brooch.  Add a magnet and create a fridge ornament. Use strong glue to add the decorated dominoes to a mixed media art project.  or just toss them on your desk or nightstand and enjoy! 

Sunday, November 14, 2010

Antique Amulets

 Today i had the pleasure of reconnecting with my old altered book workshop buddies in San Francisco.  We used to meet monthly, swap books and do a project or learn a new technique.  Today they were creating "antique amulets" based on class one of them took at Art Unraveled with polymer clay wiz Laurie Mika.
 I have only used polymer clay once before - so it was fun to learn something new!
 This was my first pendant.  I softened the black clay and rolled it to about 3/8th of an inch thick.  I stamped it with a gothic texture stamp and created a niche with the frame.  I added an image and some metal findings.  then it was baked for about 20 minutes in a toaster oven.  When it came out i added some metallic glazes and gold paint to highlight the raised areas.


 This was my last piece - you can see i had a little whtite clay left which i swirled with black to create this border.
Here are the original inspiration!  These were the samples created by Laurie Mika - not by me!  But i think i did a pretty good job emulating her style.

Tuesday, April 27, 2010

Petite Inspiration Box Swap - Box # 2

 This is the second lovely matchbox i received - from Karen. Her box was romantic with paper ruffles and vintage postcard images.
 Imagine how much fun it was to open and spread out all the goodies!
 Check this out!  She made a beautiful springtime banner! Thank you Karen!
 Here are some of the vintage postcards and images she included with the package.
 What a cool idea this is!  Stamping on muslin.  So simple and so pretty.
 I had fun opening all my boxes and "playing" with the stuff.  Here i created a little vignette featuring a yellow bird.
 Here is a rosy toned montage, complete with fabric rosettes.
And finally a collage of blue and white. It was so much fun to receive these little treat boxes.  I will surely create some wonderful mixed media collage or assemblage art to honor the three lovely women who shared the swap with me.

Saturday, February 7, 2009

More Deli paper

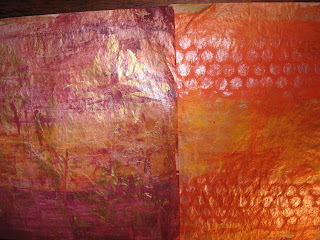
Friday morning we got together at Z's house for a play date. 4 ladies gathered together at her kitchen island to make more deli paper!We used 12" by 12" paper Z picked up at Smart and Final. She told us they have all sizes from 4" square up to about 20" x 12"! Using an assortment of liquid craft paints, metallic glazes and some sparkle paint, we each made dozens of pieces of paper. I loved using white gesso to stamp with large foam stamps, to create a batik look.We also used stencils to create some effects.
Z has already put her supply of paper to good use. She created a card for me and used a piece of painted paper to accent the card, and made a deli paper envelope.