Showing posts with label fish. Show all posts

Monday, March 9, 2015

Play Date Clay and Beads

Another play date with my gal pals to work on our beaded clay projects.  i brought this porcelain doll head with no specific plan - and it morphed into a dress form style shape. I used tin foil as a base and covered it with paper clay. I added some jewelry bits to create a tiara.  then added cheap post earrings around her bodice. 
 I filled in with strings of pearls.  Around her waist is a ribbon with beaded fringe and more jewelry findings and strung beads along the "hem".  I have her sitting in a sunny window to dry before i complete the beading.

Our hostess D worked on her bird with doll head, using some paper mache clay she mixed herself.  
it was pretty sticky - but she was able to smooth it out.  ultimately it will be covered with beads and other objects, in a steam punk style.
Z worked on a cute wooden fish she picked up on vacation in Mexico.  
She added glass bead gel as a base to inbed rows of rhinestones in clear and aqua blue.
S worked on her turtle.  First performing a turtle-head-ectomy and replacing it with a doll head.  then she started gluing on the beautiful gems and beads.  
She even creating a fringe effect with chain around the rim of her shell.

Sunday, January 25, 2015

Awesome Beaded Things

 So our friend D hosted another play date in SF this weekend.  We decided that our project should be based on K's fish - shown here.  K was inspired by the art of Betsy Youngquist.  Which is to say, a pretty ambitious project for a 4 hour play date!
 I started earlier in the week with a porcelain doll head, from my jar of doll parts.  Doesn't everyone have one?  anyway - it had to much of a torso attached, so I had to borrow Z's Dremel tool to remove it.  Not before a trip to Home Depot to purchase a diamond bit for $18.  ouch. But it was worth every cent!...it cut the porcelain like buttah!
 
Once the head was free of the excess, I stuffed the neck with tin foil and just sort of roughly built up a bird shape.  Then I covered it all with paper play.  SO easy to work with.
 Took three days to dry enough to take it to the next step.  The clay didn't have to be perfect as it would all be covered over with beads.
Oh look - a wee flock of birds!  Mine, K's future project, and D's red bird - still at this stage without its doll head. (sorry didn't get a pic of it later in the process)
 So here we are, surrounded by all manner of beads, and gemstones, and glitter and sequin, and random cast off jewelry.. ready to start.
 So I just dove right in!  I started with the silver findings around the neck and then  just kept adding rows and rows of bling. I used some extra tacky glue and applied it with a brush.
 Here is K working on her fish.  Very serious business with a lighted magnifying glass and stick pins to align bugle beads!
 here is Z working on her inlay heart pendant. 
 (she finds the doll heads a little creepy - they certainly can be!)
 Here's my bird starting to fill in.  I found the piece of woven and tasseled bead work in the bottom of a bag of stuff - and hey!  why not use it!
 I added some shell buttons to the tail to create a "feather" effect.
 A large gemstone on the back of the head created a focal point to work around.
 Here is Z's finished pendant.  She used black glitter polymer clay as a base - and inset the beads - beautiful!!
 Here is K's fish with its perfect rows of beads.
 K cut her doll's face in half to elongate it.  She is not quite finished.
 Here's me working on the bottom of my bird back home,
I used rows of thread-strung beads.  but it isn't easy.  I have a few bald spots still to fill in.
 Here is a side view.  I need to get more of the darker beads at Michaels this week to continue the field between the other elements.
 Here's a top view..
And voila!  my little flyer got some shades!!  She is just about ready to take flight!
Thanks K for the inspiration.  Thanks D for hosting. Thanks D and Z for the goodies.
Sorry S couldn't make it - we missed you!
And especially thanks again to Betsey Youngquist, without whose artwork inspiration none of this fun would have happened...thanks....!

Wednesday, October 15, 2014

Painting with Paper

I recently had a fun weekend art retreat with a couple of friends.  We wanted to try creating art with coloured paper in the style of  Elizabeth St. Hilaire Nelson.
I had an image picked out from a catalog - an abstract painting of a white sea bird.
 I started by drawing the bird on my cradled canvas board.  Then i filled in around it with torn pieces of blue and green paper - to create the sky and the water.
 Then i cut about a hundred feather like pieces of white and ecru paper for the feathers.  I glued everything down with matte medium.  Then i added skinny little strips of brown and green for the fronds and trees.  I gave the sky a bit of a wash of blue glaze to tone it down and make it more cohesive.  I am really happy with how it turned out!
 I started a second piece using two smaller cradled boards.  I did a rough painting of the 5 birds on a branch.
I didn't get very far before we packed it up for the day - just had time to add three different text papers to the branches.  light to medium to dark to try to create the depth and shadows.
My friend S had a plan to create a large canvas with koi fish.  She sketched the fish on paper and glued them to the canvas.  Then she painted a blue background for the water.
 Next she painted the fish if vibrant gold and pinkish tones.
 The she started to do her signature intricate collage work.  All those patterns on the fish are torn pieces of dozens of different hand painted and dyed papers.
She did not get her piece finished  - i cannot wait to see how it turns out!
 K decided to create smaller works - about 5 inch square - one for each vegetable she selected.  She started by drawing each veggie on the canvas.  then she painted each one to see the depth and shadows which she could use as a guide for the collage.
 Here are three of her veggies - maybe almost done.  She plans a background and perhaps some wording.  
Here is a closeup of the pepper - look how much texture there is from the collage.


Here are a few more K painted after i left.  Once you get started, sometimes it is hard to stop!  These will all get collage papers and be the ultimate artwork for a crafty cook's kitchen!  Thanks Elizabeth for the inspiration!  Your work is stunning....!!

Monday, April 30, 2012

Altered Calendar - Gifts from the Sea

If you have been following along, you know that i started a new round robin altered book project with 5 friends at the beginning of 2012.  We are altering small (5"x6") calenders.  You can see my other books HERE and HERE and HERE.
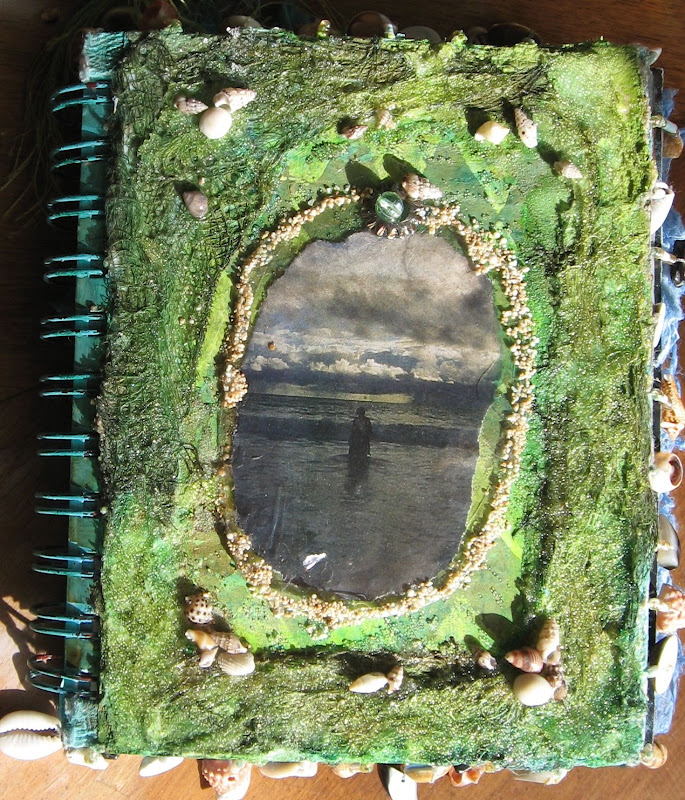
I worked in S's beautifully textured calendar for the month of April, titled Gifts of the Sea.  She used texture gels and paint to get a sandy cover and added shell fringe around the border.  We were tasked to create two spreads to represent sea life, anyway we chose.  Mermaids were already done, rats! 
 So i chose Sea Turtles!  I started with a blue and black background (google imags) of gelly fish.  Three brightly coloures turtles from a tropical brochure were my focal points.  The "coral reef" is a bejeweled chandelier from Elle Decor.  Sea weed fronds were cut from blue vellum and applied with mini glue dots. (never use wet glue on vellum - it will pucker up!)  A spiny fish sticker (cut in half) creates more interesting sea life.
 Next - Fish Eyes!  I started with a background of shiny metallic origami paper in two shades of blue green.  Then i added another Elle Decor chandelier - with hanging crystals that reminded me of a fleet of tadpoles.  They are swimming along the top and bottom on the left side.  Next as you can see are a dozen or more eyes cut from fashion magazines - with some eyelashes retained for '"fins".  Browns, blues and greens - all swimming in different directions.  I added a bit of glitter glue to make them sparkle, which sadly caused the big eye on the right to develop a crease when the paper got wet.  It smoothed out after it dried fully.
Please note the clever use (if i say so myself) of eyelash yarn to decorate the edge of the pages.
And here finally is the Sign In page - with tags for each artist to decorate.  I added some dolphin stickers and some fun fibres, along with my name and the date.  Next Month - the theme is Maps and Moustaches.  Seriously - it is a theme of D's book.  So whimsical and fun - can't  wait.  Do check back to see!