Showing posts with label dolls. Show all posts

Sunday, October 25, 2015

Pretty Play Date

I hosted a play date yesterday for my crafty friends.  We started off by creating cute drawings in the style of Danielle Donaldson.  My friend Z took a workshop with her last year at Art is You Petaluma. which is in Santa Rosa this year, a few miles north. She walked us through the steps of pencil drawing, water color, dark lines with a black marker (i used a fine tip sharpie)  then the final touch was to add details and outlines with a white pen.  Z gifted us with these awesome Uni POSCA white pens from Japan which were a joy to work with.
The table was set with random supplies, cute little decorated boxes with treats for my guests, and come painted pumpkins to celebrate the season.
This is the cute girl K made.  Her sweater looks so fluffy and soft!
M decided not to do a girl, but was quite happy to draw these shapes and then colour them in.  Sort of an abstract cactus!  After the lesson and a bit of show and tell, we each went off in whatever direction we chose.
After our lesson, Z got to work finishing up some wool felt coasters she began at a workshop we attended at the Novato Library.  We built a piece of wool felt from assorted colours of roving, using the soapy water and friction method.. To complete her project,  Z cut the piece into circles and added some swirly white wool using the needle felting technique we also learned at the library.  they are the perfect set of coasters for her recently redecorated living room.
Next K started a root veggie art piece on a birch panel. She carefully drew the shapes then painted with vibrant water colors.
M created these intricate beaded stars - part of a future bracelet. wow- that's a lot of fine detail
 I had an idea, that was inspired by a "doll" i saw at the Danville craft show a few weeks ago.  a vendor (sorry didn't get her name) had created a vintage flower frog holder for vintage pins.  she had a doll head on top with a bunch of frilly lace ass a "collar".   since i have a collection of vintage flower flogs, i thought it would be a perfect project for me.  In case you  don't know, a flower frog is used to hold flowers in place in a vase or bowl.  they come in all kinds, but this cage type is perfect to hold the pins.  I had some doll heads and arms - and just needed to create a torso.  Here you can see the two part Aves epoxy drying with some paper propping it up.
once i got started there was no stopping me!  I made three more!
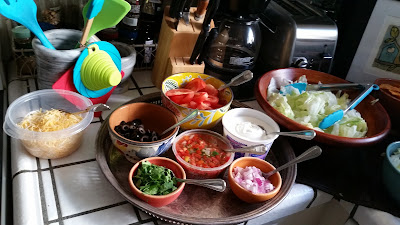
Around this time we stopped for lunch - a mexican buffet.  make a salad, a bowl, or some tacos. Perfect for all your friend's dietary desires.
We had roasted peppers, chicken strips, and ground beef.
an lots of fixin's.
We ate on the patio.
After lunch i started to decorate my dolls.  I have never really been into doll making, but it is kind of infectious.  this one had a gold tone dress with tulle skirt to match, and a dozen pins attached to her skirt.
This gal has a blue gown, with a netting skirt and vintage lace trims.
and finally a pink version with a fine organza skirt and velvet and ruffled organza trim.

what a fun day we had and the results prove that getting together with like minded friends is very inspiring!

Saturday, May 2, 2015

Diana Frey Mata Hari Doll Workshop

 This is the class sample for the workshop i took with Diana Frey at Art is You Petaluma.  So beautiful.  Can't wait to get started.  We were told to bring a thrift store doll and some accessories - let's see how it's done....
 Here is the instructions for the class.  I always appreciate the extra nice touches.
 Here is my doll - clothes and hair removed.
 First step - cover all the cloth body with Slug and Snail Copper Tape.  Apparently no longer sold at home Depot because it is cruel to the snails.... oops.
 Burnish well.  but a few wrinkles are ok.  like on my face.
 Next apply solder to the copper tape.  i may be talented and crafty, but i totally suck at soldering.  Seriously.  all that dark goop is burnt flux.  yuck.
 Luckily they make a product  to remove yucky burnt flux.  spray it on and  wipe it off.
 yay - shiny solder!
 Next apply black antiquing magic liquid to the doll.  it starts out clear and turns black on contact.  also turns you hands black.  and your cheek where you touched it with your black hands.
 Next wipe off the excess.  
(wouldn't it be nice if  we could lose weight that way?  
you know, by "wiping off the excess"??)
 Next buff with the special included buffing square until shiny.  like an iron maiden, only not nearly as scary and tortuous.
 While we are on the subject of torture devices, we made a cage skirt out of brass strips and little brads.  two of us in class had ex's named brad, but that is a whole other story....
Next paint the porcelain doll parts with white gesso.  two coats.
 Here is a random shot of the class all holding their alien looking silver and white creatures, like some kind of galactic assembly line....

 Next the teacher showed us how to paint the face.  lovely eyes - Diana makes it look so easy.....
 but isn't easy.  it is hard.  i did mine over and over and never had the patience to let them  dry so i kept smearing the irises.  they are all janky but somehow still look cute somehow.  I also went a little overboard on eyelashes, and her mouth is a bit too large.
 Homework assignment: bring home cage skirt and cover it with 7000 yards of priceless vintage seam binding.  then add little sprigs of ribbon, lace and tattered chiffon tied onto the skirt with more priceless vintage seam binding in an artistic manner.
 The next day the teacher let us get an hour in before her other class started.  She showed us how to decorate the headdress for the doll.  mine isn't finished.  there will also be some further embellishment around the bodice and neckline, and painted boots
.
I do love how her face turned out.  A final coat of extra thick glaze gives it a glossy professional effect.  and manages  to hide all the flaws.
Here is another teacher's sample.  a beautiful painted doll head on a vintage bottle.
really lovely  - we must try this!

Here are some more of Diana Frey's whimsical dolls.  I really enjoyed our workshop.  it was sadly just a tad too much to accomplish in one day,

Monday, February 23, 2015

More Beaded Things and Some Dolls

My friends Z and K came over on Saturday for brunch and some crafting.  We wanted to continue making things with beads.   Our "main" play date had to be rescheduled for March.  Here are the pendants i made, with silver fimo clay, and some black glitter clay.  One is really cluttered, one is very orderly, one is whimsical, and one is kind of cool looking!  After baking only one bead fell off, but was easily reattached with a drop of glue.

  Here is a beautiful bird pendant Z made with polymer clay and an assortment of rhinstone chain, bugle beads, seed beads and a leaf charm. After baking she'll add some flowers or beads to the two rings on the branch.
 K was busy with some interesting doll projects (see below) - but tried to make a pendant with aqua clay and gold seed beads and a couple of charms.  She didn't like the "messy" look and was going to start over!  We all know what THAT feels like!
 This was a cool to make!  it started as a paper clay heart.  I took a few dozen cheap stud earrings (i have a pal who can get them for me) and created a paper weight. I just stabbed the earring posts into the semi hardened clay.  it will be a nice conversation piece on  my desk at work.
 My friend K was busy creating these adorable little dolls with bunny ears.  One of them was made with air dry paper clay. She used 2 part epoxy for the other (i am not sure which).
 For this doll, K added some pearl ex powder to the bunny ears.  
Once she got her home, she added a tattered lace dress, wings and some flowers.  So cute!
 This pretty damsel is going to become an art doll when she is complete.
bunny ears looked so fun - so i created these with paper clay on a little plastic kewpie doll.  She is drying in a hot sunny window as we speak.  I'll paint and add a dress and other adornments once she is safe to handle.
 I dried to make a bunny with some leftover fimo clay but it ended up looking like a deer!
A deer with a snail body??  oh whatever! covered with some beads and baked it looks pretty cool!  Stay tuned for beaded things part three in a couple of weeks!

Monday, December 2, 2013

Altered Book - Paper Dolls 2

 I have been having fun creating paper dolls for L's altered book.  I previously worked on the book HERE.  Our little spiral bound calendars are almost finished their journey through the 6 of us - each getting the books twice this year to work on.  I started with a pretty gal cut from a catalog.  I put her on a swirly green paper background and added a few "fashion" phrases.  For her first frock i created a whimsical polka dot party dress and added a netting petticoat and a pink bow.  The dress attaches with a gemstone magnetic so you can actually PLAY with this paper doll!
 Here is a mod a-line dress made from a handmade paper that looks a bit like tie dye. Oops - your slip is showing...!
 All girls need a little black dress - this one cut from this silver/black check.
 Finally i made a big poufy skirt and organza blouse.  all made with paper and a copper organza bow.
 And every girl needs a nice big closet for her clothes - they all go in here!
 Here is the next spread.  A cute little kewpie style red head with a paper wardrobe accented with ribbons and trims.  Her background is a mixture of orange and purple stained ledger paper, some striped fabric and some jumbo orange rick rack trim.
All her clothes fit in the sheer pockets on the left and attach to the doll with another magnetic gemstone.  Have fun playing with your doll book L!