Showing posts with label vintage photos. Show all posts

Sunday, June 30, 2013

Altered Book : Beyond the Sepia Lens

The latest book i worked on, as part of our 2013 altered book swap, was D's book titled - Beyond the Sepia Lens.  Inside the pages of the small calendar she created a story book world where a girl swallows a moth and is drawn to the light.  We were asked to weave the
tale in and out of the past and future.
 Here is the first spread i did.  I started with a background of a aged document and added a vintage image of a lady "sprouting" wings like a moth (in keeping with the fanciful story).
I don't usually show images from my fellow artist's work - but this page D created is the jumping off point for my next spread.  She wrote that Rosa went to Cuba and met two brothers and had quadruplets.
Here is my page - showing the quadruplets a litte older.  the text says that in order to all attend the same school, they had to pretend their brother was one of the girls.
Here is the sign in page - we were each given a strip of paper to make a tag and afix to the back of the book.  I used some scraps of paper with a wee birdy or two and a scrabble letter M for May.

Tuesday, April 23, 2013

Altered Book: The Odditorium

We continue to do our monthly swap in these cute little spiral bound calendars.  This month i had the pleasure of working in K's book, entitled The ODDitorium.  We were asked to create colourful pages with equally colourful characters.  Love the trim detail on her spine.
I always wanted to try this - with my love of birds and vintage ephemera.  I used a magazine image of a garden for the background, sanding slightly to make it more aged and soft.  The girls were copied from a vintage cabinet card.  a few details were added to their dresses with blue pens.  These girls didn't have those lovely large hair bows you often see in victorian times, so a bit of vintage seam binding ribbon is soft pink was added.
For this spread i flipped through a decorating magazine looking for inspiration.  I found the elephant in a mattress ad, and the birdbath was actually a high end carved stone bathroom sink.  I added them together with a flock of small birds.  I used a similar garden image for the background and added a few flower stickers for colour.  The water splashes are blue ink and glossy accents to give them some depth.
The sign in page offered us small cards to decorate.  I added a bird and vintage postage stamp and signed the back.  Our hostess D cannot stop exclaiming how much she is LOVING these little books!  They are really developing a fun personality and are quick to alter due to their size.  As there are 6 of us in this round robin swap, we will each get the books to work on twice during the year.  By December the books are fat and full of shared art!

Block Head Dolls Play Date

We spent saturday afternoon crafting art dolls out of blocks of wood.  Our inspiration came from some similar dolls i saw online on Teresa Mcfayden's whimsical blog HERE.  I read that she got the idea from Laura Robberts blog HERE.  You can see Laura's video and even sign up for a workshop to learn how to make your own.
You can start with any old wooden blocks or shapes. I had some 1 1/2 inch childs blocks so i used those.  I stacked three together using tacky glue and painted them with white gesso.  My friend Z gave me some Jenga blocks she bought at a garage sale.  Her husband cut some into thirds to make the heads.
 The process is kind of varied but for me followed this sequence.  Cover the blocks with paper.  Add tissue napkins with gell medium to add layers.  The faces were cut from vintage photos (copies) and Anthro catalogs.  Join head with wire, a dowel, or screw eyes.  Add small nails with beads for hair and arms. 
Many of the samples i saw online showed faces with underlying or overlying text.  Since image transfer is iffy, i decided to try a technique i learned about years ago but never tried until now.  Buy a small box of roller papers and the beauty supply store.  (you know the kind you use with a home permanent?)  Use a blank ink pad, like StazOn and stamp text on the thin paper.  Then glue it onto your face with gel medium.  It literally disappears!
 For this little Jenga doll i used paper beads we made HERE.  I always thought they were kind of icky and looked like larvae and never wanted to use them for anything.  For for legs on this quirky doll i think they are PERFECT!  She isn't quite finished.  Still needs more details - hair, hat, arms, whatever.  The "you will be taught to fly" quote was cut from a napkin.
 This gal has screw eyes to join her head to body and some wire legs wrapped with paper clay.  I will paint the clay as soon as it dries completely.
 Here is a work in progress from D.  Love the tacks used for hair on this expressive face. Like her use of small spools to hold the doll upright.  (mine will probably hang on a hook)
 D made her block doll reversable - here it has a complely different look and mood.
 K's work in progress features many metal elements including a clock face and some wooden spool legs.
K also worked on this architectural creature which will have copper tassels for limbs.
 Here is a doll from Z - in progress.  She chose the zebra print to echo the edginess of the biker chick face.  A studded collar was a perfect addition.  The image in the background is our inspiration from Teresa's blog.
 Z is also creating a doll with her grandaughter's face.  Love the cute dotted sparkly dress with the velvet trim belt.
 Another work in progress from K.  As you can see just about anything goes and those butterfly wings will be really impressive on this doll!
Another piece by K - where she is using larger wooden blocks and a wooden ball for the head.  Love the lace cap contrasted with the metal elements.
As you see just about anything goes and we had so much fun creating our block head dolls!
Another successful play date!

Sunday, November 29, 2009

bingo card collage

I created 4 cute collage mini wall hangings - using bingo cards as the base.
Here is the bingo card - all new and shiny and not at all appropriate!
I started by sanding the cards with drywall sanding screen - my "sand paper" of choice. I have a huge stack of these - sold in a kit for cleaning your barbeque, actually. You can use sandpaper of course - but i just like these.
After scratching them up i applied some neutral ink to give an aged effect.
Because sanding and aging was not quite enough - i applied a bit of white gesso with a dry brush to soften the effect even more.
Now they were perfect!
Next i punched holes in the upper corners using my jumbo eyelet setter.
I used an assortment of ephemera as background - ledger pages, old legal letters and some text cut out of old novels.
I glued the ephemera onto the bingo card with a glue stick. I added a bit of faded floral print paper for some colour.
I applied the photographs with glue dots - raising them over the background for added dimension.
This gentleman's name is Siegfried Ernst. He came in a lot of old photographs i bought on ebay years ago. I used all the pics in my "reject" pile. These images were either too faded or too small to use in collage - so i separated them from the "good" ones. But their size was perfect for this project. Siegfried's little caption is about tidiness being a virtue. I added some brown ribbon and a brass metal latch for a final bit of embellishment.
This one features Rufus - a spaniel attempting to slide down a slide in someone's backyard. This was taken in 1939 in san diego. The caption is from a dictionary which states that a dog is a flesh eating animal! The card is finished off with a luggage tag strap - that sort of looks like a dog collar, and an actual rabies clinic dog tag.
This aspiring young fellow came from a set of photo booth strip postcards. His caption is asking mom where his shirt is. She just pressed it in the kitchen. Yes - i spent hours looking through books for appropriate little phrases! A Delta airlines pin finishes off this card.
And finally this card with three lads in bathing trunks. I added a bit of aqua rick rack to this card for colour and also to evoke water. And finally a numbered pin and key - the kind you pinned onto your bathing suit at the local pool, when you used the public lockers.

I finished off all 4 cards with some aqua and white martha stewart twine, from Michaels. I plan to send these off as gifts to people who recently sent me some things - as a thankyou. One of them is a guy, so they all just ended up on the masculine side. They were fun to do - and i hope the recipients like them!

Friday, October 9, 2009

Beeswax for Arts Sake...


Sorry for the absence – we have had serious internet issues over the last three weeks. We think it is finally resolved and I can once again stay in touch.

Besides, I have not been that active, creatively speaking. I seem to need a project or swap obligation to get me going. So I was anxious to participate in a local store’s collective art project.

Zinnia is an altered artist’s dream store – and it is just a hop and a skip away in beautiful South Pasadena. They recently relocated to a new store front on historic Mission Street, a larger space with better facilities and a cool classroom space. They have all kinds of workshops with renowned and local instructors. It would be a great spot for me to start up my altered book group here in So-Cal.

Anyhoo, they are sponsoring an art show in conjunction with 350.org. Each piece of artwork will sell for 350 pesos, or $26.22

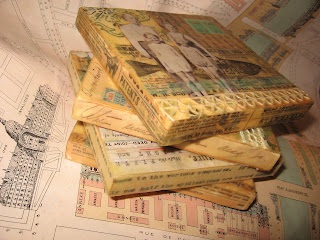
They gave away hundreds of 5” square pieces of wood for any interested artist to paint, draw, carve or collage. 5" is about 350 by 350 picas! There will be a show and sale on October 24th. Please stop by if you are in the area and check it out! Each block will be sold for $26. 350 cents from each block sold will be donated to the 350 carbon organization.

I asked for 4 blocks to create something. I knew I wanted to do beeswax collage. It gives a simple collage an organic quality that I like. I thought – this is the perfect opportunity to use ORIGINAL ephemera, why not, eh?

Of course I scanned everything first!! I was looking through vintage images and decided upon a series featuring my mother and her sister.

A few years ago I borrowed a bunch of snaps from my mother, so I could scan them and have them on hand for such a purpose. I carefully put them back in my mom’s old photo album, slipping them into the little black photo corners. I numbered the backs of each photo and the empty space in the album in pencil, to help facilitate this procedure.

The pictures are of Sirkka and Hillevi, two girls born of Finish parents, who emigrated to Canada in 1929. They range from the 1930’s to the 1950’s. They include a shot with my grandparents on a beach, the two teenage girls on the streets of Montreal, out for a drive in the country with their good friends, who became my godparents, and finally my parent’s wedding, with my aunt as matron of honour.

I started by melting the wax in a crock pot. I gave the blocks of wood a quick sanding over the rough edges. And applied a thin layer of wax. I used an assortment of ephemera – letters, ledger pages, and legal documents as background, along with some vintage floral wallpaper.

I cut out the images from the backgrounds and darkened the edges with a bit of cats eye ink. I “glued” everything to the blocks using the melted beeswax. I rearranged things as I went – some of the letters were so sheer once the wax was applied, they made better overlays than backgrounds. That’s the cool thing about working with beeswax, you can always melt it and re-position your collage materials. Or completely start over!

I also used some advertising from an 1890’s magazine. And some blue chip stamps. My heart breaks for all those 50’s housewives that collected stamps from the grocery store – only to never cash them in for prizes. Why else would I be able to get bushels of them at estate sales?

A bit of lace adds some texture and a nice romantic touch. I added more ephemera around the edges of the blocks, and finished off the back with some vintage gummed labels for my name and blog site.

So what do these little collages have to do with global warming, and the 350.org mandate? Probably nothing. But they do say something about the family and the importance of respect for the generations. And that is something we need to think about in the future. Also it is nice to think about the environment and the plight of the bees. and my beeswax artwork smells lovely of honey!